HDR Photography - what is it and how to do it
HDR photography, or High Dynamic Range photography, is a way of capturing a wide range of 'shades' (for want of a better phrase) in one image.
When someone explained that to me, many years ago, my eyes glazed over too!
In simple terms, HDR photography is a way of incorporating really, really bright whites, and really, really dark blacks, AND a really, really full range of everything else in between.
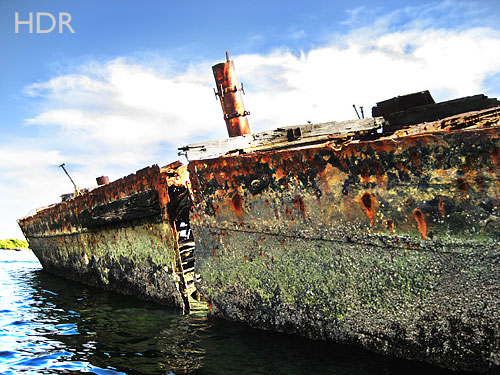
Roll your mouse over the image below to see what I mean:
The difficulty with digital photography...
...is that the image sensors in cameras aren't able to capture that full range.They tend to cover the middle ground quite nicely, but that's at the expense of losing the bright whites at the top end, or losing the dark blacks at the bottom end.
Have another look at the two images in the image rollover above. A couple of things to notice in the 'original' photo:
- The cloud is almost a solid white - no real definition there. That's what we call blown highlights (another term for you to get your head around!)
- The dark shades, especially in the 'lumps' on the deck to the right of the photo (sorry, I don't know what the 'lumps' are) are a bit of a wishy-washy grey, not black)
- The general feel of the photo is one of mid-range blandness
So now you know what HDR photography is, how do you do it?
Well, that's fairly simple. But there are a couple of steps that you need to remember before you take the photo - if you're going for the purist approach.Now you know that HDR photography has a wide range of shades, and you also know that a digital camera sensor can only capture a narrow range of these shades, a little bit of lateral thinking (are you lying down?) gets us the answer...
Take three photos of the same scene
One photo is under exposed (that photo captures the darker shades), a second photo is taken covering the middle range, and the final photo is over exposed and captures the highlights.Have a look at the three images below and you'll see what I mean:

Now you have your three photos you have, in effect, three times the range of shades that you had in any single photo before.
You have all the really dark areas from the underexposed photo, all the bright highlights from the overexposed photo, and everything in the middle comes from the normally exposed photo.
The trick is to combine them all into one photo
And that's the secret really - how do you combine all three photos into one HDR photograph?Well, this is where HDR photography can get a little tricky. In truth, you need some software to combine them all. And it needs to be reasonably good quality software too.
Basic image editing software will allow you to edit one photo at a time, but won't allow you to combine all three photos.
If you are lucky enough to have a copy of Photoshop CS2 or higher, then you can combine all three photos by using the 'merge to HDR' function.
Load up your photos, press the button, and then sit back as Photoshop does its work.
Don't have Photoshop (and who can blame you, it costs a fortune!)? There is other software that can create a HDR photography effect.
Or, you could recreate the effect yourself using Pixlr - the free online image editor. Here's a tutorial on how to make HDR photos using Pixlr.
My son (that's him below) loves F1. He's started his own YouTube channel and would love it if you could take a look at one or two of his videos.
Or, if it hurts your ears as much as it does mine, pass the link on to someone who'll really appreciate it.
Or, if it hurts your ears as much as it does mine, pass the link on to someone who'll really appreciate it.
(probably someone a lot younger than I am!)
 Get help using your camera with the complete Digital SLR Guide |