Digital photography tutorial – focus on the details for better photos
The digital photography tutorials on these pages are like having your own personal digital photography tutor! You'll find simple help, advice, tips and tricks to get you taking better photos.
As I stated on my digital photography tutor home page every snapper can produce top notch photographs. It doesn't matter how much your camera costs, or how large it is.
The thing that makes the biggest difference to the quality of digital photography is the person behind the camera. And that's you!
On this page I cover a fairly simple photography technique to improve your digital photography - concentrating on the smaller details.
Details, details, details . . .
When photographers talk about the details they are referring to the smaller parts of a photo that are often overlooked.It's tempting to get a lot of "bang for your buck" in a photo - I remember my father in law going through our wedding photos. He was choosing his selection of reprints based on the number of people in the photo.
He told me that way he got better value for money - one print, with ten people on it must be better value than one print with only three people on it!
I can see his logic, but it won't make for a better photo. In the bad old days of film photography this was probably a more common way of thinking. After all, you had to keep paying to get film developed.
With digital photography though, you don't. Simply print the ones you really want, and leave the rest to be viewed on screen.
So, in order to take better photos, try concentrating on some of those details, rather than trying to cram everything into a photo. In this digital photography tutorial I'll show you an alternative.
Below is a quick example of what can be done. Roll your mouse over the photo to see what I mean.
Don't cram!
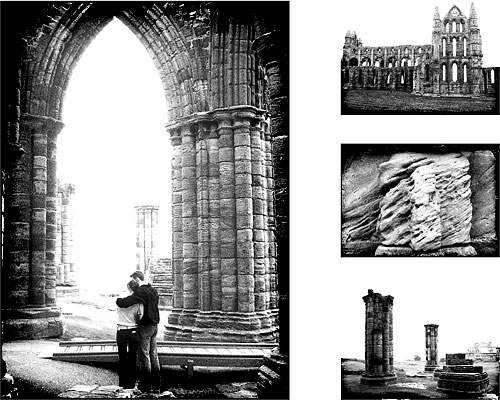
The photos are of Whitby Abbey in Yorkshire. It's a great place to visit. The Abbey is on the cliff above Whitby. Getting to it involves climbing a fair number of steps . . .. . . but on the plus side, once you've trekked back down, you can reward yourself with some of the finest fish & chips for miles around!
Back to this digital photography tutorial though. In the two photos above, the first one was an exercise in cramming everything in. The second one selects specific details.
Additionally, the second photo combines a few of those details of the Abbey into one photo. So, in a way, we're still getting value for money!
How do we do it?
This is easier than you might think. Take the abbey as an example; ask yourself what sets it apart from other landmarks in the area?There's the arches, the columns of the ruins, the weathered stone . . .
So, instead of taking a picture of the "whole", take pictures of the "parts".
Take a photo if the arch. And only the arch. Then take a photo of those columns. Finally, get in close, and take a photo of the weathered stone.
If you're going to combine the images, as I did above, then it's often worth having one picture of the "whole" to place the "parts" into context.
This isn't necessary though if you're after just one of the "parts". For example, you might simply want an artistic picture of just the stone.
Tips and tricks
Digital photography tutorial - the details tip 1Think about what makes the place unique. It's usually not the whole place.
Seek out photographs that show some of the "uniqueness" of the place. Some places are far easier than others.
Places of religious worship (cathedrals, mosques, temples . . .) are all good candidates. But what about landscapes, say?
Well, maybe there's a particular flower in bloom? A leaf, reddened by the autumn? A rock at the edge of a lake?
There's usually something you can find.
Digital photography tutorial - the details tip 2
Get in close.
Either move yourself, or zoom in, but get in close to some of those details.
When you do, aim to get only that particular detail in the frame. Be brutal about cutting everything else out. If you're really concerned about cutting a part out, and maybe losing something significant, take two photos.
After all, this is digital photography, it won't cost you anything to take more than one photo and you can delete the rest later.
Digital photography tutorial - the details tip 3
Plan ahead if you can.
If you know there are key details in advance, you can make sure you capture them.
Or if there aren't any specific details, you can have a good guess as to what might make good "parts" to your photo.
For example, the rivets on the ironwork of the Eiffel Tower; the eye of George Washington at Mount Rushmore; the paw of the Sphinx . . .
Homework
Digital photography tutorial - the details assignment!The final tip in this digital photography tutorial is to practice. Try to capture some of "the details" in your environment.
Remember that this is digital photography, so you can keep trying without wasting any film.
Your homework assignment for this digital photography tutorial then - take some pictures today, but don't take a single photo of the "whole". Every photo must be of the "parts".
- Further reading:
- Add some foreground interest
- Learn how to crop
- Cropping tutorial (software)
- Change your shooting angle
- How to use the rule of thirds
- Digital photography tutorial home page
My son (that's him below) loves F1. He's started his own YouTube channel and would love it if you could take a look at one or two of his videos.
Or, if it hurts your ears as much as it does mine, pass the link on to someone who'll really appreciate it.
Or, if it hurts your ears as much as it does mine, pass the link on to someone who'll really appreciate it.
(probably someone a lot younger than I am!)
 Get help using your camera with the complete Digital SLR Guide |