Trick photography - how to take multiplicity photos
This is a great trick photography technique - multiplicity photos. You make your subject (usually a person) appear more than once in a photo. It's easy to do, trust me!
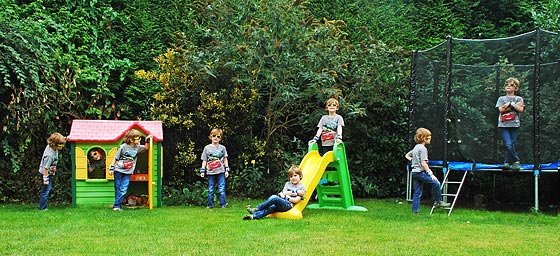
First off, if you don't know what a multiplicity photo is, have a look at the example below. It's my son, repeated eight times across the photo. It's all him, no stooges, and absolutely no body doubles!
Trick photography - how to
make multiplicity photos
- HINT: no time to go through the tutorial now? Download the eBook and video walk-throughs to your computer and browse at your leisure!
That said, there are a few things that you will need. Here's a list:
- A camera that has a 'manual' setting
- A tripod
- Photo software that allows 'layers'
- A shady day
- A willing volunteer!
If you don't have manual mode you can still get a good result by taking the photos in quick succession. That way there will be less chance of the camera altering settings between shots.
A tripod is useful (and indeed handy for a lot of trick photography, not just multiple photography), because between photos you need to make sure the camera doesn't move.
If you have a steady trigger finger, and can sit your camera on a solid surface, you could get away without using a tripod. When I took the multiplicity photo above I was too lazy to get a tripod out (shame on me!) and rested the camera on a solid surface.
Photo software - for this type of trick photography there is a need for editing. Don't panic! It isn't difficult, and I'll show you how to do it later.
If you have no photo editing software try pixlr. All you need to do is upload your photo and the editing takes place online. And it's free!
The weather ... you could try this sort of trick photography on a sunny day, but, because you need to do a bit of editing later on, the shadows get in the way.
Better to choose a shady day to avoid the shadows and make your life easier later on!
A willing volunteer! Plan the multiple images in your mind first, and then walk through it with your volunteer. "Look up at this point ... stand up here ... point to the ..." you get the idea! This way when it comes to the photo taking part they will know exactly where to stand.
Trick photography - taking the photos
Once you're set up - camera on a tripod, set to manual, zoomed out wide, and volunteer in position, it's time to start shooting.
It's easier I find to work from left to right. So ask your volunteer to stand in position on the left of the scene. Then take the first photo.
Once done, get them to move to position 2 and take the next photo. Then they move to position 3 ... and keep going until you have all your photos.
Remember that you must keep the camera rock solid as you take your series of photos.
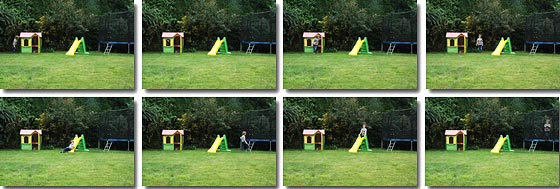
Once done you should have a set of "multiplicity photos" starter images. Here's the eight photos I started with:
The next thing to do is to stack the photos using software. This is called layering. If you use pixlr you'll see a layers palette on the right side of the screen. This is where you stack the photos.
How to use pixlr
- Begin by choosing to "upload photos from your computer"
- Then select your multiplicity starting images (you can select them all by holding down the [CTRL] key and clicking on them all, one by one.)
- Select one as your background, then choose the next layer above. Copy and paste the second layer onto the background layer ([CTRL] + [C] to copy it, then go to your background image and press [CTRL] + [V] to paste it)
- Once you've pasted the first layer you can close that window.
- Then choose your third layer and copy and paste that onto your background. Close that window once done.
- Keep going and you'll see the copied images appear as 'layers' in the palette on the right side of the screen.
To do this in Pixlr you select the layer you want to cut, press [M] to get the marquee tool. Then drag the box over your layer to select the bit you're going to cut. Pressing [CTRL] + [X] will make the cut.
The second layer down is also cut, but less so, so that the bit with my son on is poking out from underneath the top layer.
Continue doing this until you're left with a 'stack of cards'.
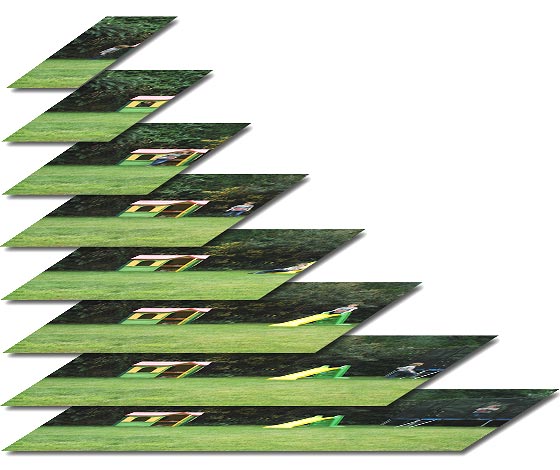
Imagine a stack of real paper photos that you then lay on a table, and look at from above. What you'd see is the top layer, and then the second layer poking out on the right, then the third layer poking out from there ... and so on.
If you like this 'trick', you'll love the trick photography eBook! Find out where you can get even more trick photography ideas.
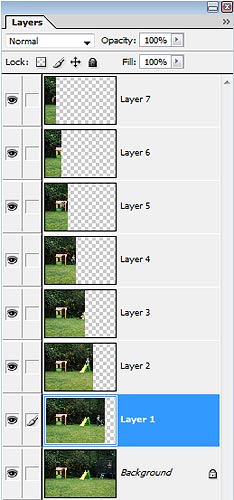
The image on the right here shows how your layers will look once you've done the cutting.
The top layer is the smallest, allowing space to reveal the next layer down.
And the second layer is a bit bigger, but still allowing space to reveal the next layer down ...
... and so on until you get to the bottom layer - the background layer - that doesn't need any cutting at all.
When you've trimmed all your images the final step is to flatten all the layers (merge them into one). If you're using Pixlr go to 'Layer' and then click on 'Flatten layers'
Once you see how the layers are set up you can see why it is helpful to work from left to right.
It's also worth planning the photos so that your volunteer isn't overlapped in any of your photos (i.e. doesn't appear above or below him/herself, only appears to the left or right of him/herself).
With this sort of trick photography it is possible to take multiplicity photos where your volunteer appears above and below him/herself. To do that you need to use layer masks.
The concept is the same. You stack your starting photos on top of each other, then you mask off the entire layer.
Next, you 'bring back' (by un-masking) just the part of the photo that has your volunteer in it, leaving the rest of the layer masked out.
This method is a bit more tricky, so I'd suggest starting with a simple left to right version first.
If this little tutorial has whetted your appetite for trick photography you might also be interested in:
- Painting with light
- trick photography effects - make a ghost photo
- Digital night photography tips
- Trick photography eBook