Trick photography effects -
how to make trick ghost photos
This is a great trick photography effect - ghost photos! You make your subject (daughter, uncle, wife ... the list is endless!) appear as a ghost in a photo. It's easy to do, honest!
If you like this 'trick', you'll love the trick photography eBook! Find out where you can get even more trick photography ideas.
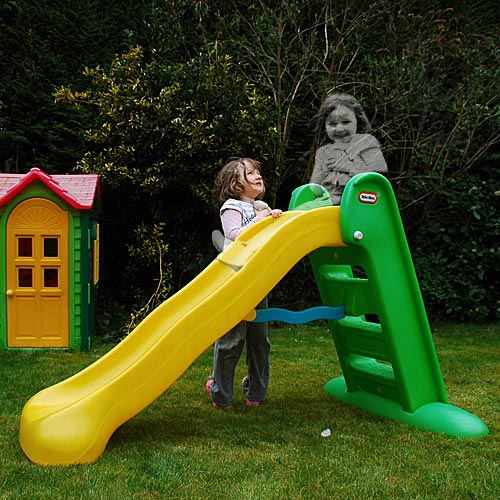
First of all, if you don't know what I mean by ghost photography, have a look at the picture below. It's my daughter (twice actually) sitting on her slide as a ghost.
I realise that this is not the most obvious place to find a ghost. But then, where is? (Actually, my mother thinks her lounge is haunted, but she is getting on a bit. Then again....!).
But I digress. It's not the slide that's important, it's the trick photography effect I've used to create the photo that's important.
Trick photography effect - how to
make ghost photos
So, now you know what this ghost trick photography effect looks like, how about having a go yourself?
As I said before it's easy. And if I can do it (with a sometimes unwilling daughter as a model!) then anyone can.
So here's what you do ...
- set up your scene,
- brief your willing (or not so willing!) volunteer on where they need to stand for the two photos,
- keep your camera as steady as possible (a tripod will help, but it's not essential),
- take the FIRST photo,
- get your model to move to their second position,
- take the SECOND photo.
Trick photography effect - how to
make ghost photos - editing
Using your image editing software (or, if you haven't got anything installed, go to pixlr and use the free online image editor) and upload your two photos.
With both photos open, click [V] on your keyboard to select the move tool, and drag the 'ghost' image on top of the background image.
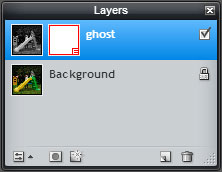
If you look at the 'layers' palette on the right of the screen you'll have two layers there.
Then, make sure you're editing the 'ghost' image (which should be the top image in the layers palette, if not, click on it to highlight it), and then go to Adjustment and choose Desaturate
Your layers palette should now look something like mine below:
Once you've done that you need to erase everything from that top image (to reveal the background layer below) except for the ghost - i.e. your model.
There are two ways to do this - the easy way, or the hard way!
The easy way ...
- choose the eraser tool (press [E] on your keyboard,
- get erasing!
- scrub out everything except your ghost
- if you go a bit wrong, press [CTRL] + [Z] to undo
- First, add a layer mask to your top, desaturated, layer
- fill your layer mask with black - this has the effect of masking everything out
- then grab a brush, and set the color to white. Now brush ONLY over your model - this will bring back part of the layer mask and, in the process, bring your model back on top
- if you make a mistake, switch color back to black and go over the mistake - black masks things out, white brings them back
To do this you change the transparency of the layer. In Pixlr, click on the small icon in the bottom corner of the layers palette, circled in red below:
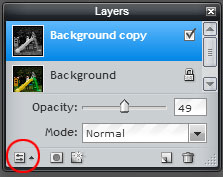
A little menu will appear with an opacity slider on it - slide the opacity down to about half and your layer will appear partially transparent - ghost like!
Final job - flatten your image. Go to layer and choose flatten image.
And there you go - a little trick photography effect to make anyone look like a ghost.
If this little tutorial has whetted your appetite you might also be interested in:
- Painting with light
- Beginners photography - capturing moving water
- Digital night photography tips
- Trick photography eBook