Blown Highlights - and how to fix them
Blown highlights are the bright areas of an image where all detail has been lost.A classic example of this is in photos that include cloud. The cloud can appear as one blob of white, rather than nice fluffy clouds!
This "phenomenon" is more noticeable in digital photography. It did occur with film photography, just not as much!
On this page there's a Photoshop tutorial on how to fix this problem.
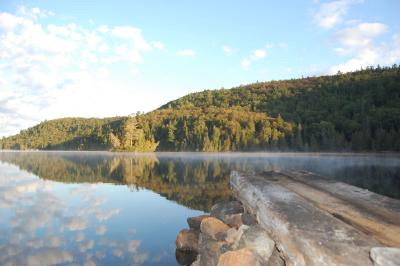
Recently I had a submission on the digital photography tutorials page of a wonderful landscape.
It was submitted by Cindy, and was a photo she took of Mongoose Lake in Canada. Click to see Cindy's submission (opens in new window).
One of the comments made was that the photo suffered from blown highlights. But not to worry, there is a fix!
| Before I go further,
it should be noted that any kind of fix will only
work to a certain degree; and it depends on the quality of the original
photo.
In the case of blown highlights, the starting image should not have completely blown highlights in it. Even if the photo is just not quite completely "blown" there is hope. However – if those highlights are really, really blown – there's no hope of recovery. So here's a useful tip: If you are photographing something with lots of white (or nearly white) in it, underexpose it a little. By underexposing it you will be able to save the highlights, and still correct the rest of the image later on using software. |
Ok, so before we start, lets have a look at Mongoose Lake. Roll your mouse over the image to see the "before" and "after" (if prompted, you will need to enable "scripts" to see the effect):
So how did we manage to get some detail back into those clouds? Here's the Photoshop tutorial to take you through the process.
NB: words in green indicate menu selections in Photoshop.
First, open your image in photoshop. Make sure you are in "full edit" mode (there are two tabs underneath File, one is "Full Edit", the other is "Quick Fix")
Then go to Layer, New adjustment layer, and then choose Levels... A new window will open, just click OK.
You will then be presented with the Levels dialog box. This is a bar graph representing all the pixels in the photograph. The pixels on the left are dark pixels, those on the right are light.
As you can see from the screenshot below, there are no pixels at the "dark" end of the scale, and many pixels bunching up at the "light" end of the scale. That's why we have those blown highlights.
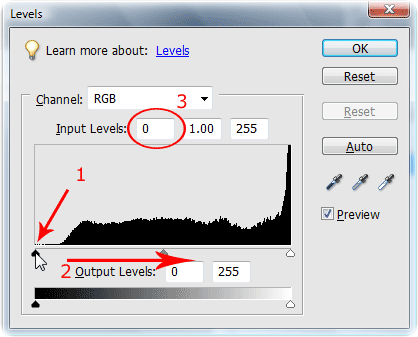
Next, drag the black marker (shown by red arrow number 1) from the bottom left across to the right (shown by red arrow number 2). As you do so the numbers in the "input levels" box will go up (circled and numbered 3 in the screen shot above). I dragged so far to the right that this number went up to "190"
As you do this your whole picture will darken - don't panic! But do make sure you do the next step carefully!
Flatten your image - go to Layer and choose Flatten Image. Then go to File and make sure you select "Save As", not "Save".
Give your file a different name from the original. I simply added the word 'dark' to the end of the original file name.
Also, choose TIF as your file type (not JPEG). TIFFs are lossless files, so no matter how many times you open and close them the quality won't change. JPEGs degrade if you keep opening and then saving them
Once you have done this, you will be able to re-open your original file, unchanged.
Done that? OK, we're ready for the next step. Make sure you have both your image files open (the light original, and your darkened version). We're going to drag one on-top of the other.
To do this, make sure you have the "Photo Bin" visible - the Photo Bin is the strip at the bottom of the screen that shows you the images you currently have open. If you can't see it, go to Window and choose Photo Bin.
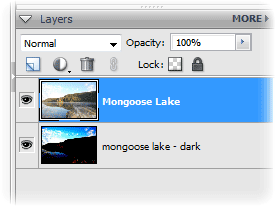
Now, click on the 'light' photo in the palette bin, and drag it on-top of the dark version that you have open.
If you look at your Layers palette at the right of your screen, it should look something like the one shown to the right here.
Now we need to erase the sky from the top image - the one with blown highlights - and allow the darkened sky from the image below to shine through.
There are two ways to do this. The simple way is to use the "eraser" tool. This can be accessed by pressing [E] on your keyboard.
By doing this your cursor will change to an eraser brush. You then just carefully erase out the light sky of the blown highlights.
The more complex way to do this, but by far the better way, is to use layer masks. The sort of layer mask I am going to show you doesn't technically exist in Photoshop Elements (it's only available in the full version of Photoshop), but there is a simple work-around.
Shortly there will be a tutorial to show you how to use layer masks in Photoshop Elements. But for now, the eraser will work just fine.
Once you have erased the blown highlights from the top image your work is done! Flatten the image, (layers, then Flatten Image).
So there you have it, a way to solve the problem of blown highlights by using Photoshop.
As a final note, if you have a digital camera that can shoot RAW images (rather than JPEGs), do so. RAW images contain far more data than JPEGs and recovery of blown highlights will be more successful
Further reading related to blown highlights...
- Shooting in RAW - is it worth it, or are you better off sticking to JPEGs?
- Understanding exposure - find out what your camera's doing whan you press the shutter
- Film V Digital - does film photography still have advantages?
My son (that's him below) loves F1. He's started his own YouTube channel and would love it if you could take a look at one or two of his videos.
Or, if it hurts your ears as much as it does mine, pass the link on to someone who'll really appreciate it.
Or, if it hurts your ears as much as it does mine, pass the link on to someone who'll really appreciate it.
(probably someone a lot younger than I am!)
 Get help using your camera with the complete Digital SLR Guide |