Digital photography tutorial – change shooting angles for better photos
The digital photography tutorials on these pages are like having your own personal digital photography tutor! You'll find simple help, advice, tips and tricks to get you taking better photos.
As I stated on my photography tutorial home page every snapper can produce top notch photographs. It doesn't matter how much your camera costs, or how large it is.
The thing that makes the biggest difference to the quality of digital photography is the person behind the camera. And that's you!
On this page I cover a fairly simple photography technique to improve your digital photography - including foreground interest.
The foreground, what foreground?
When photographers talk about the foreground they are referring to the smaller parts of a photo that are often overlooked.
They help to fill empty parts of a photograph, and can be used to lead your eye into the main subject of the photo.
When taking a photograph of something, it's that "something" that your eye concentrates on, and what ends up in your photo.
But usually there are "things" in front of the main "something" that have been overlooked.
It's probably not a very interesting "thing". And on its own the "thing" won't actually make a very interesting photo.
In this digital photography tutorial I'll show you how using that "thing" together with the main attraction will help make a better photo.
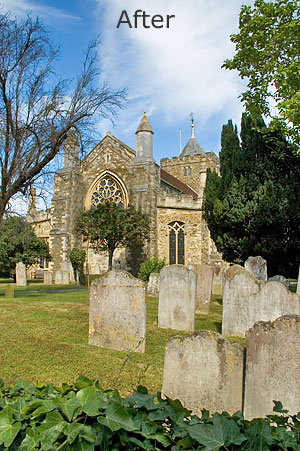
Below is a quick example of what can be done. Roll your mouse over the photo to see what I mean:
What makes foreground interest?
The trick here is not to make the foreground the focus of the photo. Use it to add a little interest, and to lead the eye onto the main subject.
The ivy on its own isn't that stunning, but it fills the bottom of the photo nicely - adds a little something where before there was nothing.
The gravestones are now at an angle. This leads your eye into the photo. Before they were just standing there, face onto the viewer. Now they've become part of the whole scene.
How do we do it?
This is easier than you might think. Take the church as an example; what else around it makes up the whole scene?
There's the ivy and the gravestones. Perhaps even the church wall.
So, instead of taking a picture of the "front", look for a viewpoint that includes some of the extra parts. And use these in the foreground.
When framing the photo, place these extras near the bottom of the frame - remember, they're just there to lead the eye into the photo, they're not the main subject.
Tips and tricks
Digital photography tutorial - the foreground tip 1
Have a look around to see if there's something else around the main focal point. It's usually something fairly insignificant (like the ivy).
Places of religious worship (cathedrals, mosques, temples . . .) are all good candidates. But what about landscapes, say?
Well, maybe there's a patch of flowers you could use? Possibly a fallen log? At the beach, maybe some rocks could be used to fill the foreground?
There's usually something you can find.
Digital photography tutorial - the foreground tip 2
Get in close.
Move yourself so that you can clearly see your main subject, but can also get in close to some of those foreground details.
When you do, aim to get that particular detail at the edge of the frame only. Remember, its job is to draw the eye into the main subject of the photo, it's not meant to be the main subject itself.
Digital photography tutorial - the foreground tip 3
Try out foreground interest at different sides of your photograph.
They don't have to be at the bottom. You could use an overhanging branch at the top of the photo.
Or you could use part of a wall or a rock at the side of your photo.
With digital photography, it's well worth trying them out. And if it doesn't work, then just delete the shot and try again.
|
Want even more photography tips and tricks? Subscribe to my monthly newsletter, "Stay Focussed" and get even more digital photography tips. Go to the Stay Focussed newsletter signup page |
Homework
Digital photography tutorial - the foreground assignment!
The final tip in this digital photography tutorial is to practice. Try to capture some of "the foreground interest" in your environment.
Remember that this is digital photography, so you can practice without wasting any film (isn't digital photography great!).
Your homework assignment for this digital photography tutorial then - take some pictures today, but don't take a single photo of the "subject" only. Every photo must include some foreground interest.
- Further reading:
- Learn how to crop
- Cropping tutorial (software)
- Change your shooting angle
- It's all in the details
- How to use the rule of thirds
- Digital photography tutor home page

