Digital photography tutorial – change shooting angles for better photos
The digital photography tutorials on these pages are like having your own personal digital photography tutor! You'll find simple help, advice, tips and tricks to get you taking better photos.
As I stated on my digital photography tutorial home page every snapper can produce top notch photographs. It doesn't matter how much your camera costs, or how large it is.
The thing that makes the biggest difference to the quality of digital photography is the person behind the camera. And that's you!
On this page I cover a fairly simple photography technique to improve your digital photography – changing your shooting angle.
What's my angle?
The shooting angle means, in simple terms, where you stood in order to take the photograph.
For most people, most of the time, they were standing up, looking face-on to their subject when they pressed the shutter button.
And why not? That's how we saw the scene, and that's how we want to remember the scene. Nothing wrong with that at all.
In this digital photography tutorial I'll show you a few alternatives. And give you a gentle workout too!
Exercise your body and mind
The first thing to consider in this digital photography tutorial is how you look at the world. Start by looking at your computer monitor. Straight on. As you normally do.
Now stand up (seriously!). Even better, stand on your chair if it's sturdy enough (but not if, like mine, it's a rickety old thing that doubles as a set of decorating steps!).
Now look directly down onto your desk. Looks different, doesn't it. That coffee cup, the pens in the pot, the paper lying around (which I will sort out one day!). You've taken the first step in this digital photography tutorial – you've looked at the world from a different angle!
Now you've tried that, get down from your chair, and crouch down. Get down so that the top of your desk is at eye level. Now look at your monitor. Different perspective again. The keyboard seems huge in the foreground.
You've completed the second step in this digital photography tutorial – viewing the same scene from two different angles.
Ok, you can sit back down again now!
Translating it to digital photography
The next part of this digital photography tutorial is to put this into practice. There's no hard and fast rules on this. Once you have accepted that photographing a scene from a different angle is possible, just let your creativity flow.
This is so easy to do with digital photography because you don't waste any film, and you can check your shot straight away. If it really doesn't look good on your camera screen, try again from a slightly different angle.
To get you started, there's a few ideas below:
Digital photography tutorial – shooting angles tip 1
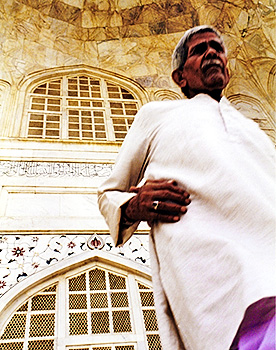
This is a photo I took at the Taj Mahal in India (good tip – get there early, the crowds really build as the day goes on!).
I took the usual photos of the Taj Mahal – you have to – then started to look for something different.
One angle I like to try is shown here. Lie flat on your back, camera pointing directly upwards.
By this time visitors were beginning to arrive, and they all walked past me on their way down the steps.
All I needed to do was wait until one of them was in the shot, and . . . click!
Digital photography tutorial – shooting angles tip 2
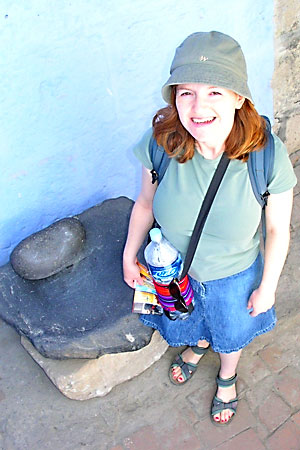
This second example was taken in an old monastery in Arequipa, Peru. Again, I had taken all the usual photos and was looking for something a little different.So, I started looking for ways to get a different angle on things. I noticed a flight of small steps and wondered how things might look from the top of them.
The result is on the right here (that's my dearly beloved standing there!).
The important thing here is again to find a different way of looking at the world.
Digital photography tutorial – shooting angles tip 3
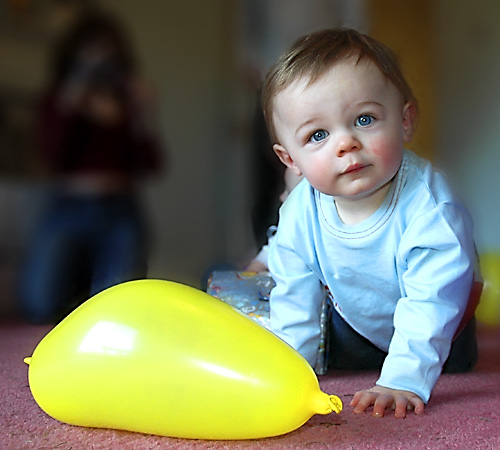
This last example for you is a classic way of photographing children, and shows perfectly the value in seeking out a different angle.
The standard photos of children generally involve a photo taken from adult head height, down at the child.
But what if you get down at the childrens' level? A different perspective now, and a more interesting photograph.
All I did here was lie down on the floor, and started snapping the little one.
Getting down to this level is a really good way to photograph children.
|
Want even more photography tips and tricks? Subscribe to my monthly newsletter, "Stay Focussed" and get even more digital photography tips. Go to the Stay Focussed newsletter signup page |
Homework
The final tip is simply to practice. Try the angles in the examples I have shown above, but also try your own.
Remember that this is digital photography, so you can keep trying out new angles without wasting any film.
Your homework assignment for this digital photography tutorial then – take some pictures today, but don't take a single one from your normal shooting angle. Every photo must be from a perspective that you wouldn't normally use.
-
Further reading:
- Add some foreground interest
- Learn how to crop
- Cropping tutorial (software)
- It's all in the details
- How to use the rule of thirds
- Digital photography tutor home page
Or, if it hurts your ears as much as it does mine, pass the link on to someone who'll really appreciate it.
 Get help using your camera with the complete Digital SLR Guide |