Digital photography tutorial – using the crop tool
This digital photography tutorial covers the crop tool. The crop tool is found in virtually every image software program (like Photoshop). And using it properly really can make a better picture.
As I said on my digital photography instruction home page, the thing that makes the biggest difference to the quality of digital photography is not the camera, it's the person behind the camera. And that's you!
On this page you'll find a digital photography tutorial covering an easy photography technique to improve your photos - making a good crop.
Before you get stuck into this tutorial, read how to select the area to be cropped on my digital photography tutorial - making a good crop page.
Meet the crop tool
To give you an example of a good and bad crop, roll your mouse over the photo below:

As you roll your mouse over the photo you'll notice three things:
- The photo has been cropped tightly around the main singer.
- The shape of the photo (its dimensions) have been changed from a slight landscape shape to portrait.
- It has been straightened up (the original had a slight anticlockwise tilt on it)
To make this crop you will need some basic digital imaging software. I've used Photoshop in this digital photography tutorial, but almost every imaging software will work.
If you don't have any imaging software (or don't want to have to pay for any!) then I can highly recommend Google's Picasa software.
Picasa not only organises your photos for you, but also comes with some useful image correction functions - the crop tool being one of them. And best of all, it's completely free!
Click here to find out more about Picasa.
Decide on your crop
Digital photography tutorial - Photoshop crop tool step 1
The first step in making a good crop is nothing more than deciding in your own mind what needs to be in a photo, and what simply adds nothing to the picture.
In the photo above the thing that really makes the picture is the singer. The other singers in the background - are they needed? What do they add to the picture?
The answer is - nothing much! For that reason we are going to get rid of them. While you are at it, also look to see if the photo is wonky at all. If it is, we'll sort that out too.
Crop tool top tip! Crop your photo because it suits the image, NOT because it suits some standard print size (like 6x4 or 7x5).
Making the crop
Digital photography tutorial - Photoshop crop tool step 2
Now you have decided which parts of your photo to get rid of, you need to actually make the crop. In this digital photography tutorial I am using Photo Shop CS.
NB: in the digital photography tutorial below, words in bold green refer to menus and menu items in Photo Shop.
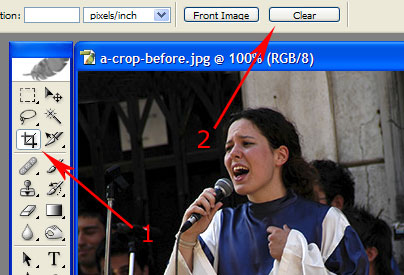
Ok, load up your image, and then find the crop tool. It will look like a little square, with lines coming off the corners. It's arrow 1 in the screenshot below.
Also, click on the button that says clear, that's arrow number 2 in the screenshot below. This will clear any numbers previously inputted.
NB: the crop tool is supposed to look like two "L" shaped pieces of card, one of them inverted. This is how we cropped in the old days! Have a look at the SLR
digital photography tutorial - making a good crop for more on how to use these "L"s.
Drag it out
Digital photography tutorial - Photoshop crop tool step 3
Once you have selected the crop tool, go back over your image and drag out a box. This may not be exactly where you want it, but don't panic! We'll sort that out in a moment.
As you drag it out a window will be drawn, and shading around the window will be applied.
Before continuing with this digital photography tutorial there's something else I want to go over with you first - the opacity. Have a look at the next screenshot, arrow 1:
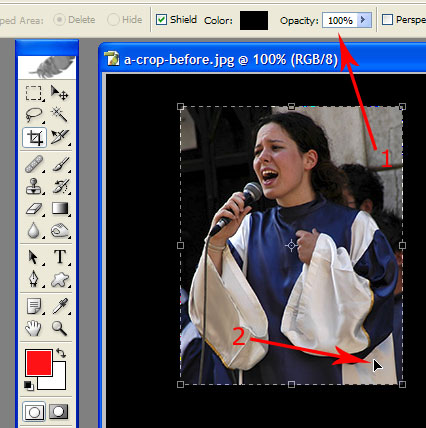
The opacity is the amount of shading. If you select a setting of, lets say 90%, the shading around the window will turn to dark grey.
This is to allow you to see what is around your crop window, in case there's something there that you want to include in the photograph.
If you set the opacity to 100% it will completely cover the background. In this digital photography tutorial I have gone for 100%, for no other reason than I prefer this setting!
But you may want to lower the opacity a bit so that you can see what else is in the photograph. There might be something lurking there in the background that you absolutely must include. Lowering the opacity will allow you to see it.
Making changes
Digital photography tutorial - Photoshop crop tool step 3
I said we could make changes before committing ourselves to the crop. Here's how we do it. First, have a little look at the cursor, arrow number 2 in the screenshot above.
This cursor changes both shape and function, depending where you are in the crop area. I've shown the three most useful ones below:
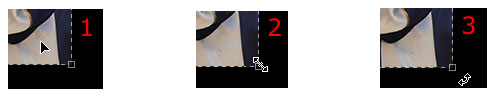
Taking them one at a time:
- Cursor 1 - placing your cursor just inside the crop window gives this arrow. Click & hold your left mouse button, then move your mouse to move the whole crop window around the photo.
- Cursor 2 - placing your cursor on the square "handles" at the corner of the crop window gives a small double arrow. Click & hold the left mouse button, then drag your mouse to enlarge or shrink the crop window.
- Cursor 3 - the little known function of the Photo Shop crop tool! Moving your cursor to just outside the corner of the crop window produces this small, curved, double arrow. Click & hold the left mouse button, then move your mouse left and right to rotate the crop window.
Making a commitment
Digital photography tutorial - Photoshop crop tool step 4
Once you have resized your window, moved it to where you want it, and rotated it to see how it looks, you're ready to commit the crop.
You won't actually be able to do anything else in Photo Shop until you either commit to the crop, or discard it.
Have a look at the screenshot below, there are two arrows:
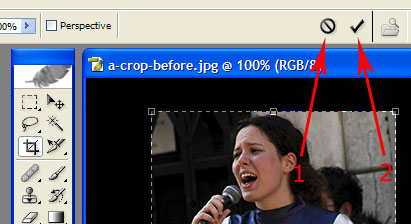
If you don't like the crop you have set, and would like to start again, click on the button marked by arrow 1. No changes to your digital photo will be made, and you can start again.
If, on the other hand, you're happy with the result, then click on the tick, arrow 2, and your digital photograph will be cropped.
Here's a little tip in this digital photography tutorial that also works for any other application in Windows - the "undo" function.
Hold down the [Ctrl] button, and then press [Z] on your keyboard. This will "undo" your last action - in this case, the crop.
In Photo Shop, it acts like a toggle button. Keep the [Ctrl] button held down, and then press [Z] a few times. You will go to before and after the crop.
This can be useful because it gives you an instant comparison as to whether your crop has improved your digital photograph or not.
- Further reading:
- Add some foreground interest
- Learn how & where to crop
- Change your shooting angle
- It's all in the details
- How to use the rule of thirds
- Digital photography tutor home page
- Stay Focussed FREE newsletter, with subscriber only content
Or, if it hurts your ears as much as it does mine, pass the link on to someone who'll really appreciate it.
 Get help using your camera with the complete Digital SLR Guide |