Digital photography tutorial – making a good crop
As I said on my digital photography tutorial home page, the thing that makes the biggest difference to the quality of digital photography is not the camera, it's the person behind the camera. And that's you!
On this page you'll find a digital photography tutorial covering another easy technique to improve your photos - making a good crop.
The crop tool is found in virtually every image software program (like Photo Shop). And using it properly really can make a better picture.
Before loading up your photo in your software, have a look at the tips and tricks here first to find out what makes a really good crop.
Crop - it's not seedy
Ask a farmer and a photographer what a good crop is, and you'll get two different answers.
One will say "wheat" and the other will ask "how long have you got?"!
In photography, a crop is the way in which a photograph is framed. It's the parts of the photo the photographer chose to leave in, and the parts to cut out.
Most people choose to leave far too much in their photos - so here's the first tip in this digital photography tutorial - be ruthless with your crop!
To give you an example of a good and bad crop, roll your mouse over the photo below:

You decide
Digital photography tutorial - making a good crop, step 1
The first step in making a good crop is nothing more than deciding in your own mind what needs to be in a photo, and what simply adds nothing to the picture.
In the photo above the thing that really makes the picture is the main singer. The other singers in the background - are they needed? What do they add to the picture?
The answer is - nothing much! In that case, we should get rid of them!
Here's a simple technique to help you decide what should be left in, and what can go:
- Look at a photo
- Cover a part of the photo with your hand
- Now look at your photo again (keeping it part covered)
- Do you miss the part under your hand?
Making the crop
Digital photography tutorial - making a good crop, step 2
Now you have seen that some parts of a photo can easily be removed, we need to take the art of cropping one step further.
For this you'll need two "L" shaped pieces of card. Using an old cereal packet will work just fine.
Place them over your photo, with one of them inverted. This makes a frame around your picture.
Have a look at the diagram below to see what I mean:
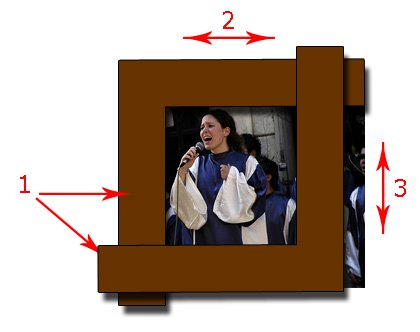
Flipping L!
Digital photography tutorial - making a good crop, step 3
In the diagram, arrow 1 points to the two pieces of card - one of them is flipped to invert it.
What you then do is slide them left and right (arrow 2) and up and down (arrow 3). As you do so you change the shape of the window that is now framing your photo.
Keep changing the size and shape of your window until the photo looks about right. Remember that you can be quite ruthless because you're not actually cutting anything at this stage.
What you are doing though (and this is quite important) is training your eye to view things differently.
Don't forget to rotate too
Digital photography tutorial - making a good crop, step 4
Now you have had some practice at changing your "window" - take things a step further!
Why not rotate your window?
Go for a slight angle, or be quite dramatic and really change the angle. Larger angles work well with both action shots, and, perhaps surprisingly, people. The best people shots to try this on are party photos.
Rotating rarely works for landscapes, unless you are rotating the photograph in order to straighten up a wonky horizon. Wonky horizons never look good!
Once you have moved the angle, rotate everything so that your "window" is lined up properly, but the photo behind is angled. Then look through the "window" again.
You'll be quite amazed at how simply rotating the picture can improve things.
Tips and tricks
Here's a summary of tips to help you make your photographs really stand out, by simply making a good crop:
- digital photography tutorial - crop tip 1:
- Be ruthless about removing parts of the photograph that don't really add to the overall picture.
- digital photography tutorial - crop tip 2:
- Get yourself two "L" shaped pieces of card. Use these to try out different crops in your photographs.
- digital photography tutorial - crop tip 3:
- Try rotating the crop, and then re-aligning the photograph behind. This can make a really dramatic difference to the picture.
- digital photography tutorial - crop tip 4:
- Don't be restricted by standard print dimensions (e.g. 6 x 4 inches, or 7 x 5 inches). Crop to suit the picture, don't crop to suit the print size. Incidentally, a square crop works especially well for many photos.
|
Want even more photography tips and tricks? Subscribe to my monthly newsletter, "Stay Focussed". You'll get even more digital photography tips and gain access to free subscriber-only content!Go to the Stay Focussed newsletter signup page |
And finally - homework assignment
Now you have some useful tips on how to crop your photos to make a better picture, the final tip in this digital photography tutorial is to get some practice.
I mean it! Take the scissors to that cereal box and make some "L" shaped framing cards.
Then find some of your old photos and try framing them with the card. See if you can improve the photos by simply cropping them.
I'll bet that you find more than a few photos in your collection that could be improved with the simple tips and tricks you have read about here.
- Further reading:
- Add some foreground interest
- Cropping tutorial (software)
- Change your shooting angle
- It's all in the details
- How to use the rule of thirds
- Digital photography tutor home page
Or, if it hurts your ears as much as it does mine, pass the link on to someone who'll really appreciate it.
 Get help using your camera with the complete Digital SLR Guide |