Flower photography - use depth of field to get great flower photos
Flower photography should be one of the easiest things to do in photography - after all, the subject doesn't even move!
But sometimes, despite our best efforts, there are still those flower pictures that lack a little punch.
Here I show you how to get a really good flower picture using simple easy to learn techniques.
And when you've finished here, have a look at my photographing flowers home page for even more tips and tricks.
Flower Photography - using the aperture
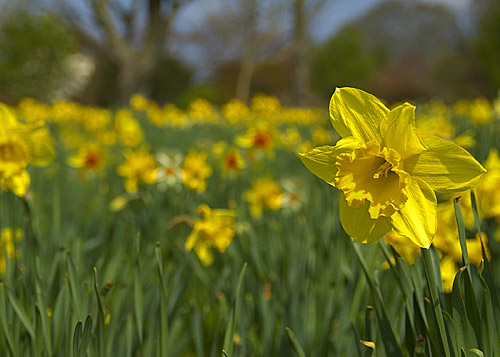
A useful tip for great flower photography is to get down there with the flowers yourself.The photo below is the one I will use as an example here.
It neatly demonstrates how a change in shooting angle, and a few tweaks to camera settings, can make a dramatic difference to your flower photos.
Take a look at the photo below:
So what are the photography secrets in this photo that makes it a good shot?
The big thing is the use of the aperture which has been used to control the depth of field.
Depth of field is a way of describing how much of a photo is in focus (from front to back of a scene).
In this photo the daffodil in the foreground is in crisp focus and those behind blur into the distance.
This crisp foreground and blurred background helps the lone daffodil at the front to stand out in the scene.
To do this you have to set the aperture on your camera to it's smallest number (the number will usually be preceded by the letter f, and the numbers are called f-stops)
Click to find out more about depth of field.
Once you have set your aperture, focus on the flower in the foreground. Then hold your shutter button down half-way (to lock the focus) and then reframe the scene.
Here, I reframed the scene to ensure the in-focus daffodil was to the right of my shot - better than slap bang in the middle of the scene!
Flower Photography - get down on it!
To get flower photos like this you really have to get down there in the undergrowth.Lie or kneel right down low so that you are at the same level as the blooms.
Then, pick one, just one, flower that will be the focus of your attention. Once you have your flower - be patient.
The problem is that, because these flowers are outside, they tend to move in the wind.
The solution to this is to wait for a calm spot, and focus on the flower. Hold your focus. If there is no wind and you have time to re-frame your scene - do it and take the shot!
However, if the breeze starts and the flower moves, hold fire! If you take the photo when the flower is moving you will end up with a blurry flower.
Simply wait until the breeze stops. No need to re-focus - the flower will move back to the position it was in before the breeze blew.
Flower photography - post processing
To really make your flower photography stand out from the crowd you will need a litle post processing .In the photo above I used Photoshop to do the following:
- First - crop the photo if it needs it (see here for help on cropping)
- Then boost the contrast setting a little (this will make the colours appear more saturated)
- Boost the saturation (but only if the colours are a little weak)
- Sharpen the photo (look for a sharpening setting - use your software's 'help' function to find it - it will be there somewhere!)
My son (that's him below) loves F1. He's started his own YouTube channel and would love it if you could take a look at one or two of his videos.
Or, if it hurts your ears as much as it does mine, pass the link on to someone who'll really appreciate it.
Or, if it hurts your ears as much as it does mine, pass the link on to someone who'll really appreciate it.
(probably someone a lot younger than I am!)
 Get help using your camera with the complete Digital SLR Guide |