How to use your aperture to control depth of field
A common way to use the aperture on a camera is to control the depth of field.
If you have a digital SLR camera you will definitely be able to use this.
If you have a compact digital camera have a look through your manual for "aperture" settings.
If you're not too sure what the aperture is, or does, have a look at my understanding aperture home page for more.
This page concentrates on how the aperture on a camera can be used to control the depth of field.
And once you know how to control it you can use it creatively in your photography.
What is it, then?
Depth of field is a measure of how much of a photo is in focus. If you use a compact digital camera, and use it in auto mode, you probably have a "long" depth of field.This means that practically everything in your photo will be in focus.
Manufacturers do this deliberately. It's because this way the focusing ability of the camera can be less precise, and still deliver a sharply focussed photo for you (aren't they caring!)
So, you might well ask, why would we want it any other way? The reason is that the effect can be put to creative use.
Digital SLR cameras are usually more precise with their focussing and enable the photographer to produce a shallow depth of field.
And it's the shallow depth of field that is commonly used by photographers.
Phew! Lots of talk! Time for a photo to demonstrate the effect. Roll your mouse over the photo below:
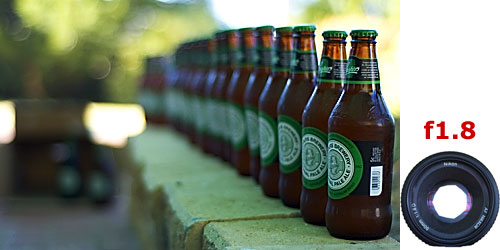
Ten green bottles . . .
You'll notice that, when you roll the mouse over the photo the amount of the photo in focus changes – i.e. the depth of field changes.Often photographers are after a shallow depth of field. This is shown in the photos above by the "f1.8" photo.
The key thing about a shallow depth of field is that, because only a small area of the photo is in focus, it concentrates the viewer's eyes on that part of the photo. It isolates the subject from its surroundings.
Why do I want a shallow depth of field (d.o.f.)?
Because a shallow d.o.f. isolates the subject from its surroundings, it is really useful in portrait photography.
And because a lot of the photos we take are of people, it helps to know how to separate them from the background in this way.
But what about the other photo – f22?
The other photo shows a long d.o.f. – pretty much everything in the photo is in focus. This is useful too, for those times when you really do want everything in focus.
Landscape photographers often want to use this effect because they want to get the whole scene in focus – from the flower in the foreground to the mountains in the background.
Some landscape photographers go even further and use a technique called hyper focussing. This is a method of getting even more of your photo in focus. It's too complex to throw in here – it's something for another page!
What are all those f's for?
If you've already read my page explaining aperture you'll be ahead of the curve here.The aperture is the hole that helps control the amount of light that hits a digital camera's sensor. The "f" numbers are a way of describing how open of closed that hole is.
A smaller "f" number indicates a large hole, and a larger number indicates a smaller hole (confusing, isn't it!).
Apart from controlling the light, the aperture also affects the d.o.f.
Go back to those photos above. The camera lens in the bottom right shows how large or small the aperture was when the photo was taken.
When the aperture is wide open – f1.8 – we get a shallow d.o.f. And when the aperture is closed – f22 – we get a long d.o.f.
So, if you want to use your aperture creatively, get playing with it and start controlling your depth of field!
- Further reading:
- Aperture - to help understand depth of field
- Understanding exposure
My son (that's him below) loves F1. He's started his own YouTube channel and would love it if you could take a look at one or two of his videos.
Or, if it hurts your ears as much as it does mine, pass the link on to someone who'll really appreciate it.
Or, if it hurts your ears as much as it does mine, pass the link on to someone who'll really appreciate it.
(probably someone a lot younger than I am!)
 Get help using your camera with the complete Digital SLR Guide |