Digital wedding photography editing tip – color popping with Photoshop
On these pages I've gone through some digital wedding photography tips.

|
The emphasis here is on editing the images after the happy event.
If you haven't done so yet, make sure you have a look at the digital wedding photography editing home page for more ideas on editing your wedding photographs, and indeed your digital photography in general.
This page concentrates on creating an effect in Photoshop called color popping. This effect works well for weddings, and digital photography makes it easy to do. If you don't know what this looks like, roll your mouse over the photograph below to see the effect:
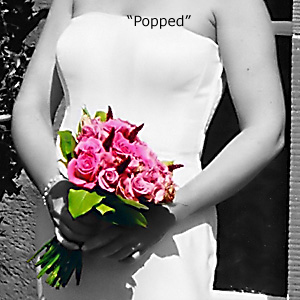
The reason this effect works well for digital wedding photography is because it can really emphasize a bright and colorful part of the photograph. For wedding photography, flowers make an obvious choice.
It also works well in other areas of digital photography. Landscape digital photography suits this effect well – picture in your mind some colorful flowers in the foreground, against a backdrop of black and white hills.
So how do we achieve this digital wedding photography effect? It's really easy! Most imaging software will work. Here we've used Photoshop (CS or Elements work the same for this).
Ok, we'll assume that you are sitting at your computer with a suitable image from your wedding photography at the ready (or perhaps an interesting landscape from your digital photography collection?). You have loaded that image up into Photoshop, and you've taken the phone off the hook!
NB: in the tutorial below, words in bold dark blue refer to menus and menu items in Photoshop.
First of all, you need to add a new adjustment layer. This is easily done. Go to Layer, choose New Adjustment Layer, and then select Hue/Saturation… from the pop-out menu.
NB: remember that in menus, anything followed by three dots “…" means a window will appear asking you to change some settings.
The screenshot below shows you what to select:

In the window that opens, move the Saturation: slider all the way to the left. Or you could type “-100" in the box if you prefer. See the screenshot below:

What we have done here is completely de-saturated our wedding photograph. In other words, we've taken all the color away and made it black and white. Remember though that we have done this on a new layer, not on the original photograph.
NB: Important wedding photography editing tip: make sure you do this on a new adjustment layer - DO NOT just de-saturate your original image!
Next step, we need to mask certain areas of this new adjustment layer. What we are going to do is let the black and white effect show through on some parts of our photograph, but allow the color to show through in other areas.
To do this, bring up the Layers palette. You can do this by hitting F7 on your keyboard. You should see something similar to the screenshot below:

Ok, once you see the layers you will notice that your original wedding photography image is still there. But above it is the new adjustment layer that we created. Next to this new layer is a white box, arrowed in the screenshot above.
The white box is that adjustment layer's mask. At the moment it is completely white. This means the adjustment layer affects everything below it. We are going to punch some holes in it – to allow the full color wedding photograph below to show through.
Ok, so how do we do that? Easy! First, click on the white box (the mask) with your mouse. This tells Photoshop to select the mask for us.
Then have a look at the screenshot below:

So there's three arrows here. We'll take them in order, one by one, to show you what you need to do next.
- Click on the small white squares, just below the two larger squares. This sets the color swatches to pure black and white. See arrow 1
- Click the small double arrow above the larger squares to toggle between black or white as the foreground color. Click it a few times if you like! Make sure when you've finished the black square is on top of the white square. See arrow 2
- Finally, select the brush tool. See arrow 3
Now for the fun part! With your brush, go onto your wedding photograph, and start “painting" with it. As you do, the color from beneath shows through!
If you have a look at your Layers palette as you do this, you will see that the mask now has black holes in it where you have painted.
See the screenshot below:

Arrow 1 points to your brush,
arrow 2 shows the holes in the mask we have created.
Here's the best part - and this is why using an adjustment layer is the best way to do this. Suppose you made a mistake. Easy to correct! (Ahh, the wonders of digital photography!)
Go back to that little double arrow that toggled black and white. Click it. Change the foreground color to white. Paint over your mistake!
What you are doing with the white brush is filling in the holes in the mask.
Black makes holes in the mask, white fills them in.
Once you have made all the holes where you want them, the final step is to flatten your new wedding photography image.
Go to Layer and choose Flatten Image.
As we said at the start of this Photoshop tutorial, this effect works well in other areas of digital photography too. It doesn't have to be reserved for wedding photography. So go ahead and get creative!
|
| Subscibe to my monthly newsletter |

| |
 One boy. Six times? In the same photo??? Find out how! |
|
Top 5 most popular pages: |