Repair photos with Photoshop Elements clone stamp tool - Tutorial
Repair photos? Why? Maybe you have been digging around in that old shoe box full of photos and found a few damaged ones? Don't discard them, repair photos with Photoshop's clone tool, and give them a new lease of life!The clone stamp tool is one of those tools that sits in Photoshop's tool palette, and rarely sees the light of day.
It is often used for "cloning out" unwanted parts of a photo.
The classic chimney sticking out of your best friend's head springs to mind.
It's an ideal candidate for the clone stamp tool. The tool can be used to remove that chimney, and restore your friendship!
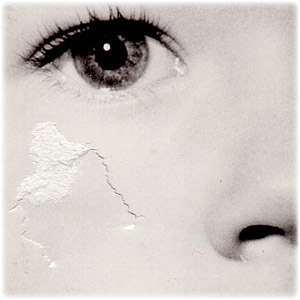
But Photoshop's clone stamp tool can also be used to fix photos. Torn photos? Stained, perhaps? The clone stamp tool can repair photos so seamlessly that you'd never know they had been damaged.
The photo below shows what can be done to repair photos with the clone stamp tool. Roll your mouse over the photo to see the before and after clone stamp.
|
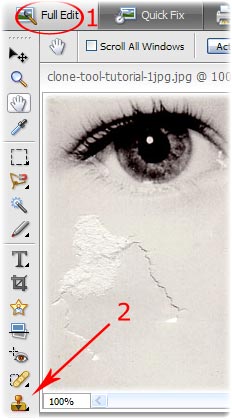
Repair photos with the clone stamp tool - tutorial step 1: First, you will need to scan your damaged photo. Lay it as flat as you can on your scanner and scan it. Save the scanned image onto your hard drive. Load up Photoshop and then open the image you have just scanned. NB: This tutorial uses Photoshop Elements, but it works the same in the full version of Photoshop. In Photoshop Elements, make sure you are in "Full Edit" mode - see number 1, circled in the screenshot to the right. Then click on the clone stamp tool, arrowed in the screenshot to the right: |
|
|
The clone stamp tool cannot be used directly. Before you can use it you have to tell Photoshop which area of your photo you want to take a sample from.
Think of this in terms of a quilt that has a small hole in it. You need to repair the hole, but you need to find a piece of matching material that will fit over the hole first.
In Photoshop, you first have to find a part of the photo that matches the damaged part that you want to repair. Usually this will be near to the damaged area.
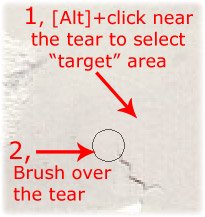
Once you have identified a part of the image that you think can be used to repair your photo, hold down [Alt], then click on the sample you want to use. This is called your "target" area. Photoshop will use this area of your photo to patch the damaged part.
Once you have set the target area, begin to brush over the damaged area. The screenshot above shows you what to do.
Top tip 1:
Keep re-selecting the target area, and then dab the brush over the damaged area of the photo. Doing this will help the repair to blend better.
Top tip 2:
Make sure you use a soft brush (Photoshop's brushes are soft by default, so you should be ok here).
Top tip 3:
Use the "[" and "]" keys on your keyboard to make your brush larger or smaller - "[" will decreases your brush size, "]" will increase it.
Repair photos with the clone stamp tool - tutorial step 3:
Keep working around the damaged area of your photo. Take is slowly, and choose your target areas wisely.
If you make a mistake while cloning, and a patched piece looks obviously out of place, undo your mistake. You can do this by going back up through your work in the "History" palette, or, the keyboard shortcut to undo is [Ctrl]+[Z].
Now you can repair photos...
Why not make more use of Photoshop's tools?How about having a go at 'airbrushing' your teeth whiter (which is far cheaper than a visit to the dentist!)
Or maybe beef up the colours in those sunset photos to re-create the wow factor of the sunset when you first took the photo.
Then there's the more complex stuff like using layers to manipulate your images 'til your heart's content?
I'm not suggesting you do all this today
For a start, if you're anything like me, there's work to do, kids to organise, dinner to cook...And then, maybe when the kids are in bed, you find a little bit of spare time to fiddle around with Photoshop.
Unless, of course your favourite programme has just started, your friend has just called, or maybe Facebook is calling you!
Which means there's even less time to play with those images.
So I have a solution
There is a little known set of Photoshop for beginners tutorial CDs that take you through Photoshop step by step.I say "CDs" but, in the 21st century, it's really an instant download (remember when we had to wait for things to arrive in the post? Or is that just me??!)
The beauty is that you don't need to pressure yourself to learn all the tricks now, you can download them, save them, and have a play whenever the kids are in bed/programme's not on/friend isn't on the phone/Facebook is updated* (*delete as applicable!)
Here's where you can get more information on the tutorial CDs
I hope you've found this tutorial on how to repair photos useful. And I hope you manage to restore some of those stained and torn photos of yesteryear successfully!

|
- Further reading:
- Digital photography tutor
- Photoshop for beginners - tutorials
- Photoshop tutorial - Photoshop's drawing tools
My son (that's him below) loves F1. He's started his own YouTube channel and would love it if you could take a look at one or two of his videos.
Or, if it hurts your ears as much as it does mine, pass the link on to someone who'll really appreciate it.
Or, if it hurts your ears as much as it does mine, pass the link on to someone who'll really appreciate it.
(probably someone a lot younger than I am!)
 Get help using your camera with the complete Digital SLR Guide |