Digital photography printing using Photoshop
Knowing how to use Photoshop to properly prepare images for digital photography printing is important. Follow these simple steps and instantly you will get better printing results!
These pages on digital photography printing, and digital-photography-tips.net itself, are updated regularly. To learn out about the updates as they happen subscribe to the digital photography blog, and this site’s RSS feed.
Start right
As a starting point, it helps to know a little about image resolution. In essence, any digital photography print should have a resolution of 300ppi. This is explained in my
simple guide to resolution.
Before you even start to edit your photos in Photoshop (or any other digital photography editing software) you need to
think about how big your final print is going to be. Once this is decided on you can then set up your blank document in Photoshop.
In the example used here I have gone for a standard 6 x 4 inch print.
In Photoshop, go to ‘File’ and then ‘New’. A window will open up looking like the one below:
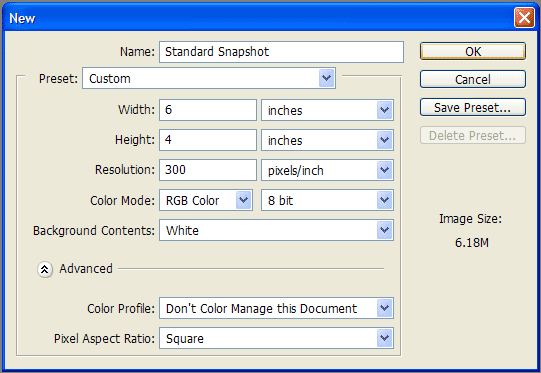
The important boxes in this window are:
- Name – I’ve called mine “Standard Snapshot”
- Preset – select “Custom”
- Width - the width of your final print. Mine is 6 inches.
- Height - the height of your final print. Mine is 4 inches. NB: ensure you set “inches” in the drop down boxes to the right of the width and height boxes.
- Resolution - set to 300. NB: Double check the drop down box is set to “pixels/inch”.
Once this is done, click OK and your blank document is ready! You've completed the first step in producing quality digital photography printing! What you have actually done is set up a high resolution print that is 6 x 4 inches.
Bring on the photograph
Now you need to add your image. Find the image you want to print and load it into Photoshop. Make sure you have both the blank document and your image visible on screen. See the example below:
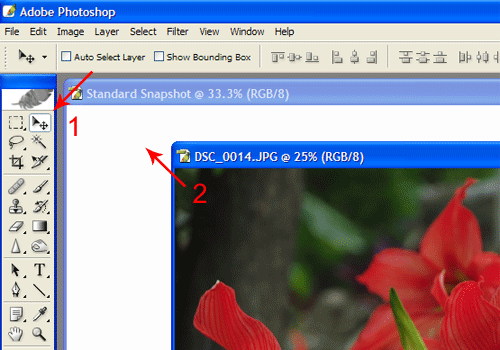
What you now need to do is transfer your photograph over to your blank document.
The easiest way is to:
1Select the move tool by clicking on it, or press [V] on your keyboard.
2Move the cursor on to your photograph, click on it, hold down the mouse button, drag it over to the blank document, then release the mouse button.
Once you have transferred your image to your blank document you can close your original photograph and concentrate on the new document.
Resize your photo
Now, to tidy up – your image probably wasn’t the exact same dimensions as the blank document you created. You will need to resize it.
- First, maximize your window to give yourself a bit of space.
- Then go to ‘Edit’ and choose ‘Free Transform’ or just press [Ctrl]+[T] on your keyboard. A bounding box will appear on your new photograph.
- Use the corner handles to adjust the size. Hold down [Shift] on your keyboard as you adjust the size to keep the image perspective.
- Move your mouse over your image until your cursor changes to a small black dart arrow. Click and hold to move your image around. This will have the effect of cropping your image.
- When you’ve finished resizing and moving, press [Enter] on your keyboard.
Hey presto! You now have a high quality 6 x 4 inch digital photography image ready to print!
Click to find out more about
digital photography printing.
Return to digital-photography-tips.net home


