Artistic wedding photography - vignette effect
A vignette effect is a great artistic wedding photography effect. And it's easy to produce with digital photography.
 |
This digital wedding photography tutorial concentrates on creating a vignette effect in Photoshop and Photoshop Elements.
There are more artistic digital wedding photography effects and tutorials on the editing wedding photography home page.
Artistic vignette - what is it?
A vignette effect makes a nice artistic wedding photography effect. It draws the viewer into the photograph, without really knowing why.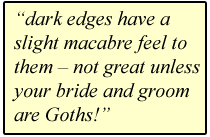
This artistic effect is simply a lightening (or darkening) of the edges of a photograph. It's this that draws the viewer into the photo.
In the old days of film you had to position a mask over the lens in order to create this effect. The mask just crept into the edge of the photograph. This darkened the edges.
For artistic wedding photography though, dark edges have a slight macabre feel to them – not great unless you are photographing a Goth's wedding!
In the world of film photography the trick to making a white artistic vignette effect, rather than black, was to apply the mask at the developing stage (i.e. the darkroom). The edge of the photographic paper then gets less exposure, and the picture fades away at the edges.
This artistic wedding photography effect is far easier to achieve with digital photography. The digital wedding photography tutorial here takes you through all the steps. And if you really want that “Goth” look, I'll show you how to do that too!
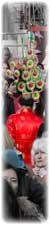
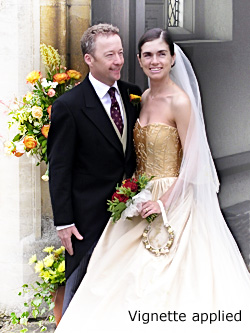
Before starting, have a look at the image below to see what a vignette effect does. Roll your mouse over the image to see before and after images.
NB: in the digital wedding photography tutorial below, words in bold green refer to menus and menu items in Photoshop and Photoshop Elements.
Starting point
Ok, let's get some nice vignette artistic wedding photography going. Load a suitable digital photograph into Photoshop.First we have to select the Marquee tool. It's the dotted square icon, red arrow 1 in the screenshot below.
Once selected, go to a position about a fifth to a quarter of the way in from the top left corner of your photograph. Click, hold the mouse, and drag the marquee out to the bottom right corner. See arrow number two in the screenshot below.
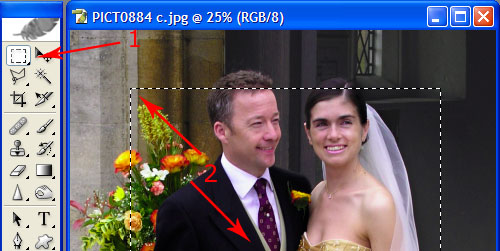
What we have done here is selected the middle of our photograph. In this artistic wedding photography effect we want to select the outside edge, not the middle of the photograph.
To do this go to Select and choose Inverse.
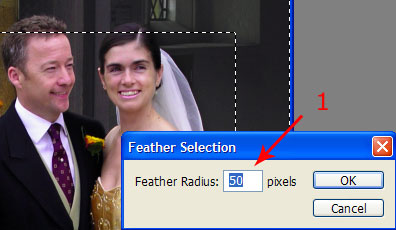
Feather your edges
Once done there is a little more we need to do before we can start our artistic wedding photography vignette effect. The selection at the moment is harsh. We want to blend the selection a little, so that it fades away from the middle of the photograph.The next step in this tutorial is to feather the edges of our selection. Go to Select and choose Feather. In the dialog box that opens up (see screenshot below) choose a level of feathering. It's measured in terms of pixels. For a 3 megapixel image, something like 50 pixels will work well.
By all means experiment though. Provided you never save your image over the top of the original you can always start again.
Now we have our selection we can get this digital wedding photography tutorial off the ground! We're ready to apply our artistic wedding photography vignette effect. To do this we are going to add an adjustment layer (Curves in Photoshop, levels for Elements users).
The magic of adjustment layers
Your selection should still be visible on your photograph (the “marching ants”). Then go to Layer and choose New Adjustment Layer. For Photoshop users choose Curves, for Elements users without a Curves function choose Levels. Name the layer if you like, then hit OK.The curves dialog box should pop up, like the one in the screenshot below (Elements users will see the Levels box appear).
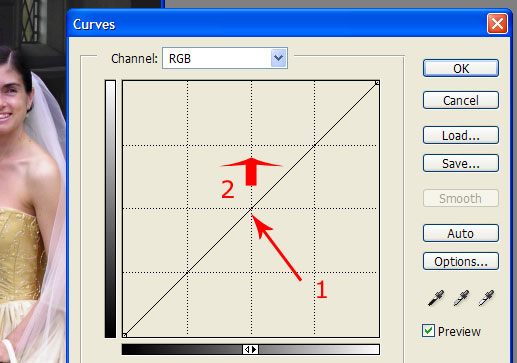
What we have done is added an adjustment layer over our original photograph. But the centre of the layer is masked out (i.e. not selected). This means that any adjustments we make only affect the edges of our photograph.
For artistic wedding photography a good look is to fade out the photograph. To do this, click the centre of the diagonal curves line (arrow 1 above) and drag it upwards.
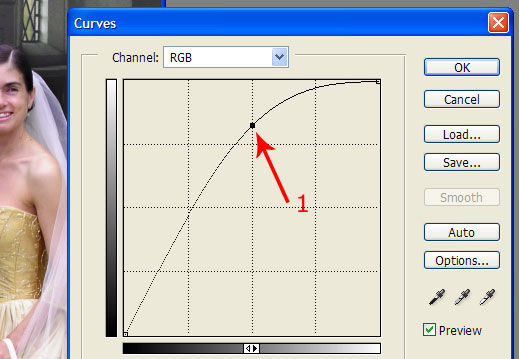
If you look at your picture as you do this you will see the edges get lighter. For Elements, using levels, move the centre slider, the grey one, to the right to achieve a similar effect.
Your curve should look something like the one below:
And for the more macabre
I did say there would be something in this Photoshop tutorial for the Goths! If you want to reverse the effect – in other words make the edges darker – pull the curve downwards (Elements – move the centre slider to the left). This darkens the edges.As always in artistic wedding photography – experiment a little. Adjust your curves until you get a good photograph.
This “controllability” is one of the best things about digital photography. If you don't like the look at first, adjust it until you do.
Once you're done, don't forget to flatten your image. Go to Layer and then Flatten Image. Finally save it under a new name. Do not save it over your original image. Read this important digital wedding photography tip to find out why.
So there you have it. A simple Photoshop tutorial to create an artistic wedding photography effect, by applying a vignette. Click to go back to my editing wedding photography home page for more digital wedding photography tutorials and more artistic wedding photography tips.
My son (that's him below) loves F1. He's started his own YouTube channel and would love it if you could take a look at one or two of his videos.
Or, if it hurts your ears as much as it does mine, pass the link on to someone who'll really appreciate it.
Or, if it hurts your ears as much as it does mine, pass the link on to someone who'll really appreciate it.
(probably someone a lot younger than I am!)
 Get help using your camera with the complete Digital SLR Guide |