Digital wedding photography editing tip – pop art Photoshop tutorial
On these pages we have gone through some digital wedding photography tips. The emphasis here is on editing the images after the happy event.

|
digital-photography-tips.net is updated regularly. To learn out about the updates as they happen click here to subscribe to the digital photography blog, and this site's RSS feed.
Jump straight to Quick Links
How to create a pop art effect
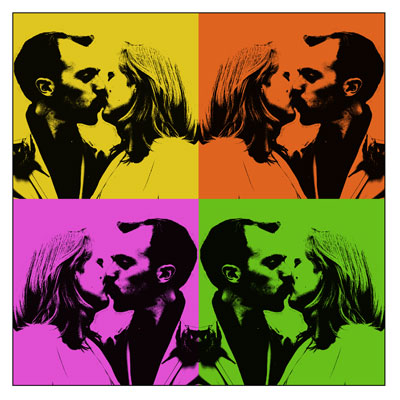
This page concentrates on creating a pop art effect using Photoshop. This effect works well for weddings - it gives wedding photography a really contemporary feel. And digital photography makes it easy to do!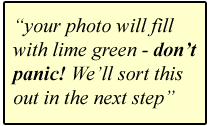 So what is pop art? Pop art is a term given to images that have a 1950's comic book style about them. Colors are simple, bright and are used in blocks, rather than blended in.
One of the most famous of the pop art "artists" was Andy Warhol. His pop art picture of Marilyn Monroe is surely amongst the most recognizable images in the world.
But what of digital photography I hear you cry! Fortunately digital photography makes it easy to create a pop art effect. And, as I mentioned earlier, it works really well for contemporary wedding photography.
There's an example below, followed by a Photoshop tutorial (CS or Elements) to show you how to achieve this pop art effect.
NB: In the tutorial, words in bold dark green refer to menus and menu items in Photoshop.
Choose your image from your wedding photography collection. Choose something that will suit the pop art style - photographs of people usually work well.
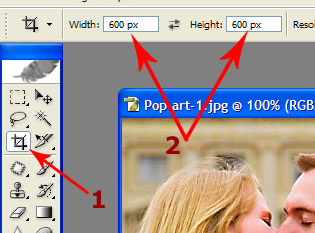
Open your image in Photoshop, then crop it to make it square. To do this, select the crop tool (arrow 1 below), and make sure you have the same number of pixels entered in the width and height boxes (arrow 2 below).
Once cropped you are ready to start applying the pop art effect to your photograph!
Wedding photography editing tip - pop art Photoshop tutorial, step 2:
We now need to remove the color. On your keyboard hold down [Ctrl]+[U]. The Hue/Saturation dialog box will appear. Drag the Saturation slider down to -100 (or just type -100 in the Saturation box). Click OK once you've done that.
Now we have a black and white image, we need to make the image less detailed - we need to have fewer levels of black to gray to white.
Wedding photography editing tip - pop art Photoshop tutorial, step 3:
To make the image more distinctly black and white (rather than grayscale) we need to boost the contrast. The best way to do this is to go to Layer, then New Adjustment Layer and choose Brightness/Contrast. Click OK in the dialog box that appears.
You then get a new box with brightness and contrast sliders. It should look like the screenshot below:
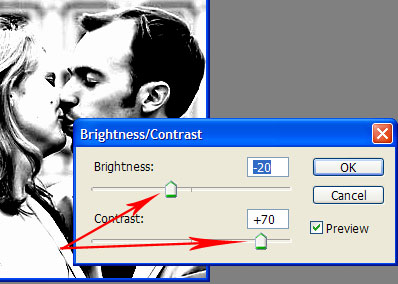
You need to move the contrast slider to the right (I've gone for a value of +70). You might need to adjust the brightness slider to compensate (I adjusted the brightness down to a value of -20).
You should end up with a nice contrasty image. Don't go too far with the contrast though - pop art needs a bit more than pure black and white to work.
NB: You might want to remove some parts of the background at this point. To do this, select your background layer (hit F7 in Photoshop CS or F11 in Photoshop Elements, then use the Eraser tool to rub out any areas of the background you don't want.
Finally, flatten your image - go to Layer and select Flatten Image.
Ok, done that? Good! We're ready to add color.
Wedding photography editing tip - pop art Photoshop tutorial, step 4:
We need to add color on a new layer. Hold down [Shift]+[Ctrl] on your keyboard. Keep holding, and then press [N] - as if by magic, a new layer will appear!
Wedding photography editing tip - pop art Photoshop tutorial, step 5:
We're going to fill this layer with our chosen color. First we need to choose our color though.
Click on the color swatches (arrow 1 in the screenshot below), then choose your color using the slider and the color swatches (arrow 2 below). Once you have a color you like, click on OK.
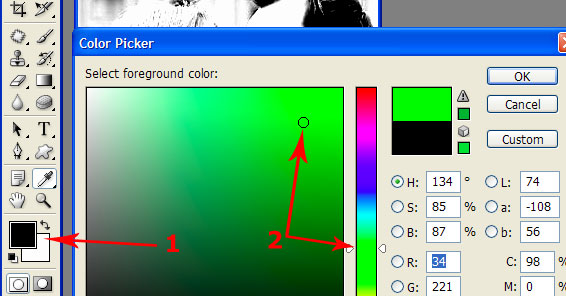
Remember, this may be wedding photography (and normally I'd suggest something subtle) but it's "pop art" wedding photography - make your color bold and bright! I've gone for a lime green color.
Now go to Edit, and then Fill… In the dialog box make sure you have foreground color selected where it says Use: (in the Contents drop down menu). Then click OK.
DON'T PANIC! - your photo will fill with the color you chose. We're going to sort that out next.
Almost there! - pop art Photoshop tutorial, step 6:
Bring up your Layers again (F7 in Photoshop CS, or F11 in Photoshop Elements). Click on your newly filled colored layer (arrow 1 in the screenshot below) to make sure it's selected. Then click on the drop down arrow (arrow 2 in the screenshot below).
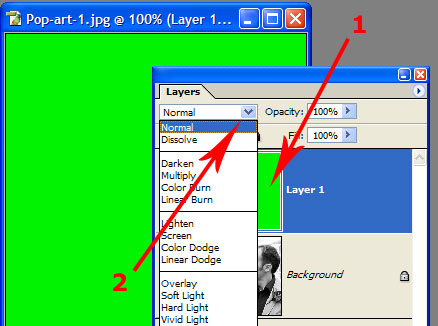
A new menu will drop down. This allows you to select the layer mode. It is automatically set to normal. You need to change it!
For pop art you can choose from a number of modes. Try them, and see what suits your photo. Good ones to try are Multiply, Color Burn, Color Dodge, Overlay and Hard Mix. I suggest you try them all, and see what looks best for your image.
- Quick links and further reading:
- More wedding photography Photoshop tutorials
- Checklist for wedding photographers
- General tips for wedding photographers
- Stay Focussed - FREE newsletter
My son (that's him below) loves F1. He's started his own YouTube channel and would love it if you could take a look at one or two of his videos.
Or, if it hurts your ears as much as it does mine, pass the link on to someone who'll really appreciate it.
Or, if it hurts your ears as much as it does mine, pass the link on to someone who'll really appreciate it.
(probably someone a lot younger than I am!)
 Get help using your camera with the complete Digital SLR Guide |