Photo editing software review - Photoshop Elements
As already explained on the photo editing software home page, photo editing software usually has two parts to it - the album (that organises your photos) and the editing part (that allows you to edit your photos). This page focuses on Photoshop Elements (called simply "Photoshop" from here on).To start with the album part of Photoshop - it's absolutely brilliant! It has some really clever tricks up its sleeve that make using it a breeze.
And the editing part - it's far better that anything else available in this price range.
Without hesitation I can say that Photoshop is the best photo editing software there is for the home user.
Find out why I rate this photo editing software so highly by reading the hands-on review below. Or jump straight to the summary
What's it like to use?
When you first install Photoshop it will ask you where your photos are stored on your hard drive. Once you have selected the folders you click on the "Get Photos" button and it searches those folders for you.It will find pretty much every file format there is (jpeg, gif . . .), including RAW files. You may not know what a RAW file is, (find out more here) but many digital cameras are now able to take RAWs, and if you accidentally set your camera to RAW (instead of jpeg) by mistake, at least you can be sure Photoshop will be able to read and edit it.
Once it has found your photos it will display small thumbnails of them so that you can easily see what you've got.
But this photo editing software goes much, much further. As it finds your photos it will, if you want it to, automatically fix red eye as it goes. Granted, this is something that most image editing software can now do, but Photoshop was the first on this, and I'd say still the best.
Have a look at the screenshot below:
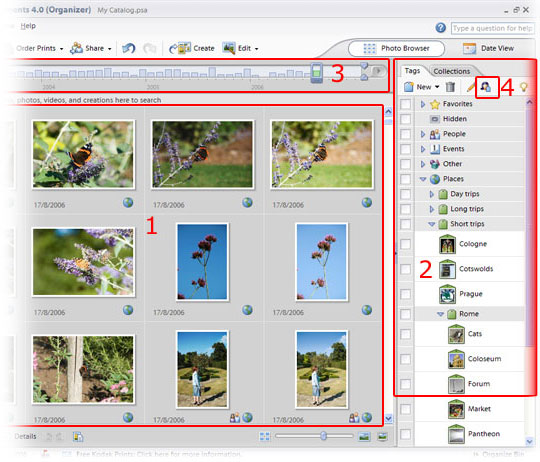
I've highlighted four key areas of the album part of this photo editing software.
First, box 1 - these are the thumbnails that were created as Photoshop found your photos.
Box 2 shows you the "tags" that most (but not all) photo editing software has. Photoshop tags are by far the easiest to use. You can add new tags, add new categories and even add sub categories. More on tags below.
Box 3 is a timeline. You can drag the slider along the line and Photoshop will show you photos taken in those months.
But this photo editing software allows you to be even more precise. You can switch view to "Calendar" view, and this will show you every day (like a calendar), with a thumbnail of one of your photos representing the days when you took pictures. Very neat!
Box 4 is the "find faces" icon. Click this and Photoshop will find faces of people in your photos. When this first came out it struck me as some sort of sourcery. Most camera phones will do this now it has to be said, but again, I think Photoshop is still the most accurate because...
... once it's found photos that contain peoples' faces it will select relevant tags for you to use and can even auto-tag your photos if you want.
More to tags than meets the eye
To add a tag you just drag it from the tags box and drop it onto the photo you want to tag. What could be simpler?If you select more than one photo (by holding down [ctrl] or [shift] while clicking on them) you can even tag them all in one go.
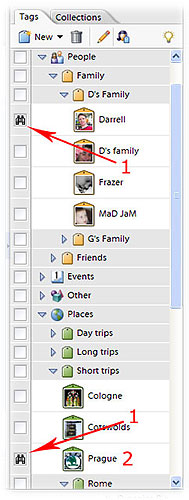 |
The screenshot to the left shows the tags part of this photo editing software in a little more detail.
Firstly, this photo editing software allows you to use multiple tags. These are invaluable! For example, you could have a "holiday" tag, and a "friends" tag. Then you can search for both and find only photos of your friends on holiday! In the screenshot to the left I've selected "Darrell" and "Prague" (numbered "1"). So Photoshop will only show photos of Darrell in Prague. But there's even more to this - look at the tags in the screenshot. I've customised my tag icons so that they have a small photo on them. The "Prague" tag (number 2 in the screenshot), for example has the Skoda badge - part and parcel of Prague! Being able to customise your own icons like this makes it incredibly easy to find your photos. |
And the editing part . . .
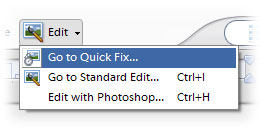
With this photo editing software you get not one, but two (and possibly three) ways to edit your photos. Click on the "Edit" tab, and a menu drops down (see screenshot to the right)
The options are "Quick Fix" or "Standard Edit" (or, if you already own the professional version of Photoshop, as I do, you can also use that to edit - it's the third choice in the screenshot).
 |
This is another one of those neat touches that makes Photoshop the best photo editing software there is.
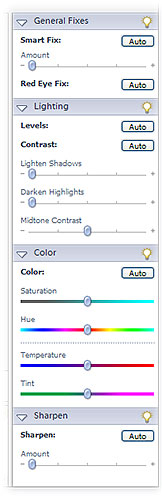
Mostly, a quick fix is all that's needed for a photo. Or, it may be that the standard editing is a little too complex for some users at first. The point is, you get both! If you just want the quick fix - it's there. And if you want to start airbrushing away some wrinkle lines, or stick the head of a donkey on the body of your best friend - it's there too, in the "Standard Edit" section. If you have a look at the screenshot to the left you'll see the options for the Quick Fix. Just hitting the "Auto" buttons will improve your photos. But if you want to be a little more creative, you can manually adjust the sliders. And if you get stuck, there's help always available - just click on the light bulbs and help will appear! |
If you want to do more than simply "fix" your photos, and get really creative, then choose the "Standard Edit".
This takes you to the fully functioning photo editing software. Here you can play with your photos 'til your heart's content.
All the advanced features are there, including the all important layers feature that allows you to blend effects to your liking. You'll be able to recreate every image editing technique imaginable!
There isn't space in this review to go over everything that Photoshop offers. Suffice to say it isn't the world's best selling photo editing software for nothing.
It really is superb. And if, in the future, you decide to really get stuck into digital photography, you can easily upgrade to the best photo editing software money can buy - Photoshop CS - and everything will be familiar to you.
One final touch of brilliance is that once you have finished editing, Photoshop will save your changes as a copy, and store it in your album together with the original.
This means your original is safe, in case you later change your mind about your edit. And you can easily find the edited photo again because the tags you placed on the original get copied over. Superb!
Photo editing software - Photoshop summary
To sum up, the positive points first:- The album is the most versatile there is - you'll never have a problem finding your photos again
- Album uses multiple tags
- Automatically fixes red-eye as it adds photos to the album
- Finds faces in your photos
- Choice of editing options - Quick Fix is dead easy to use
- The "Standard" editing features are second to none
- Edited photos are saved as a copy, but with all the original's tags attached
- I'm struggling here. Honestly, there is absolutely nothing negative that springs to mind. This really is a wonderfully complete package.
It costs a little more than the other photo editing software available for the home user. But trust me when I say it's worth every penny!
A simple search in Google will take you to the most appropriate download location (or even shop - remember those!) for the latest version of Photoshop Elements.
My son (that's him below) loves F1. He's started his own YouTube channel and would love it if you could take a look at one or two of his videos.
Or, if it hurts your ears as much as it does mine, pass the link on to someone who'll really appreciate it.
Or, if it hurts your ears as much as it does mine, pass the link on to someone who'll really appreciate it.
(probably someone a lot younger than I am!)
 Get help using your camera with the complete Digital SLR Guide |