Tips and tricks to help with your flash photography
Night photography, or flash photography?When it comes to night photography, so often we reach for the flash switch on our digital cameras.
We assume that, as it's dark, we'll need to switch on our flash so that we can take a photograph.
But hold on a moment! First try to understand the effects of flash on your photograph. Then use what you have learnt to improve your photography.
NB: One of the worst effects of flash photography is red eye. Click to read how flash causes red eye, and how to avoid it.
- Type of camera
- Don't forget the background
- Flash recycle times
- Flash fall off
- Better still, don't use the flash night photography
- Definitely use daytime flash
First things first . . .
Your options for flash photography will vary depending on what sort of digital camera you own.If you have a point and shoot compact camera you will have less control over your flash photography. This is because these cameras are designed to do everything for you, in one neat package.
If you own a digital SLR, your flash photography options really open up. Digital SLRs come with a built in flash the same as compact cameras. But they also have the all important "hot shoe".
You can slide your own flashgun (if you have one) onto the hot shoe. This will be more powerful than any on-camera flash, and will also allow you to "bounce" and "diffuse" your flash too.
Don't worry if you only have a compact camera. There are still tips here that will help your flash photography.
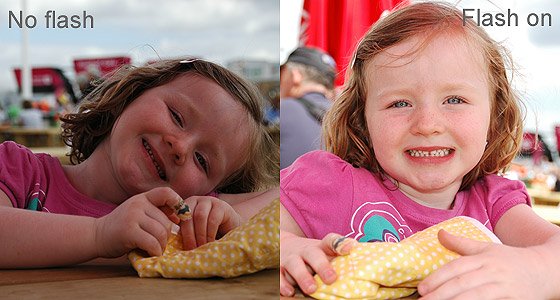
Use daytime, or fill-in, flash
Digital flash photography – tip 1:One often overlooked area of flash photography is the use of flash in the daytime.
If it's a particularly bright sunny day, turning the flash on works wonders. It has the effect of filling in the shadows, which is why it's also called "fill-in" flash.
On most cameras you'll need to adjust the settings to force the flash to fire in the daytime. It won't do it automatically because the camera will think that there's sufficient light in the scene and therefore no need for flash.
But take a look at the two photos above. I took these photos last year at the Olympic Park (weren't we lucky to be able to go!). WIth the flash on you can clearly see that the photo is better illuminated. Without the flash the photo looks very flat.
Time to recharge . . .
Digital flash photography – tip 2:Second flash photography tip – learn how long it takes your digital camera to recharge the flash.
When you take a photo using the flash, it won't fire again until the flash has recharged. This is sometimes called the recycle time.
The recycle time varies on a couple of factors:
- How good the batteries are. The more charge there is in the batteries, the quicker the recycle time.
- How much of the flash discharged. Sometimes the flash only needs to fire at half strength. In this case it recycles faster.
Flash falloff . . .
Digital flash photography – tip 3:Flashes, particularly on compact camera, suffer from flash falloff. This means that the flash is more powerful in the middle of the photo than at the edges.
The easiest way to assess this is to take some test photos of a plain coloured wall at night.
Take a photo of the wall standing, perhaps six feet away, then move further back and take another photo. You'll see an effect similar to the one below:
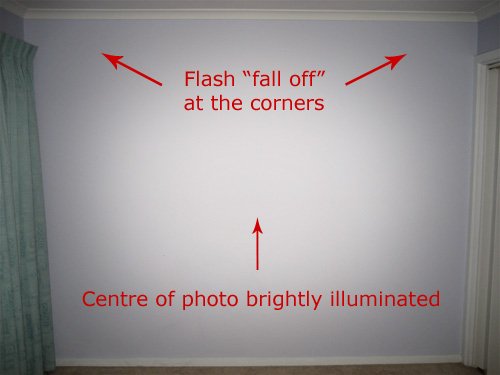
So how can you use this to improve your flash photography? Well, once you know where your flash is strongest, you can position your subject(s) so that they are in the area that you know will be well lit.
There's an extra part to this. You'll also notice that the flash gets weaker the further away your subject is. Because of this, for flash photography, try to get people in groups to stand side by side, rather than behind each other.
If they stand behind each other those at the front will be bleached out (because they are closer to the camera the flash is more powerful) and those at the back will be in darkness (because the flash is weaker where they stand).
Kill the flash . . .
Digital flash photography – tip 4:The final flash photography tip on this page – kill the flash. Switch it off. Get rid of it.
Because the light from cameras' flashes is so harsh, you will often get better results by turning it off altogether. There are a couple of tips to help you here.
First, consider your subject. It is relatively stationary? If it is, then here's what you should do:
- Firstly, turn off the flash
- Then either place your camera on a tripod, or onto any suitable solid surface.
- Now, because you are going to need a long shutter speed, use the self timer to fire the shutter.
Thankfully, the world of digital cameras has another solution to this area of flash photography. It's called the "film speed", or ISO (see understanding exposure – film speed for more on film speed and ISO).
For flash photography, try this tip. Instead of switching on your flash, try raising your camera's ISO instead. This will make your camera more sensitive to light, and may well mean that you don't need to use the flash at all.
It's behind you . . .
Digital flash photography – tip 5:Here's my final flash photography tip – check what is behind your subject before you press the button.
The reason is this – any reflective surfaces will bounce the flash straight back to the camera. You'll see a big blob of flash on your photos.
The usual suspects are mirrors of glass behind your subject. It could also be any other reflective surfaces; polished silver trophies, for example.
So to avoid this, make sure you either move your subject, or move the reflective surfaces.
- Further reading:
- Understanding exposure
- Digital night photography tips
- Equipment for night photography
- Reducing red eye in flash photography
- Stay Focussed newsletter
My son (that's him below) loves F1. He's started his own YouTube channel and would love it if you could take a look at one or two of his videos.
Or, if it hurts your ears as much as it does mine, pass the link on to someone who'll really appreciate it.
Or, if it hurts your ears as much as it does mine, pass the link on to someone who'll really appreciate it.
(probably someone a lot younger than I am!)
 Get help using your camera with the complete Digital SLR Guide |