Contemporary wedding photography tips - multiple exposures
On these pages I have gone through some contemporary wedding photography tips, with the emphasis on editing the images after the happy event.
This page concentrates on creating a multiple exposure effect in Photoshop.
This effect can work well for wedding photography, and digital photography makes it easy to do.
If you haven’t done so yet, make sure you have a look at the
contemporary wedding photography editing home page
for more ideas on editing your wedding photographs, and indeed your digital photography in general.
These pages of contemporary wedding photography tips, and digital-photography-tips.net itself, are updated regularly. To learn out about the updates as they happen subscribe to the digital photography blog, and this site’s RSS feed.
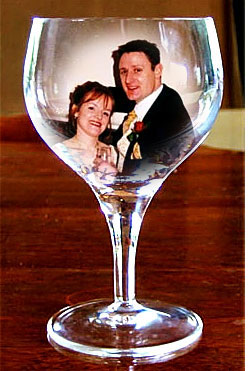
A multiple exposure can make a nice contemporary wedding photography effect.
If you don’t know what a multiple exposure photograph is though, have a look at the wedding photograph to the left - there's two photos there, one on top of the other.
In the beginning . . .
I think it helps to know what is happening with a multiple exposure, so I’ve gone into a little detail on that next.
If you’re a dedicated digital photographer and want to leave the film days in the past, click here to
jump straight to the Photoshop tutorial.
Ok, a brief explanation of multiple exposures then. In the eighties,
when women wore shoulder pads and men grew “mullets”, we photographed weddings on film. And for some reason multiple exposures were a popular contemporary wedding photography effect.
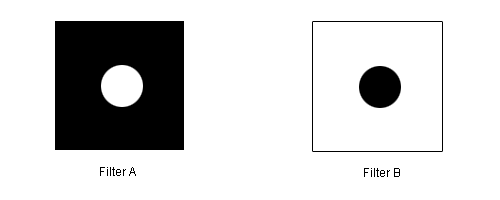
With film, we achieved this effect by using special mask filters. The filters looked like the images below.
The way to use these filter masks was as follows:
- Take a photo with filter “A” over the lens. This exposes only the centre of the film. Outside the centre is masked off so no light hits the film in those areas.
- Ensure the same frame of film is still in the camera. This was almost impossible to do with some cameras, because you couldn’t reset the shutter until you’d wound the film on. Some cameras had a special switch that let you reset the shutter without moving the film on.
- Swap filter “A” with filter “B”. Then take the second photo. This exposed everything except the centre of the photo.
What you ended up with was two images (the centre of one, plus the surround of another) on one frame of film.
I’m not going to lie to you – it was fiddly! And it didn’t always work too well, because if you weren’t careful when you swapped masks the “centre” and the “surround” didn’t match up. And then there were apertures to consider; and then . . . arrgh!
Thankfully, with digital photography, you don’t have to go through all this torture!
Contemporary wedding photography – the digital way
Achieving this contemporary wedding photography effect is easy in Photoshop. To start with you will need two suitable images.
NB: in the digital photography tutorial below, words in bold green refer to menus and menu items in Photoshop.
Open them in Photoshop and decide which image you want to be the “centre” and which image do you want to be the “surround”.
The most common way of choosing is to have the faces of the bride and groom as the centre.
Contemporary wedding photography tips – multiple exposures pt 1:
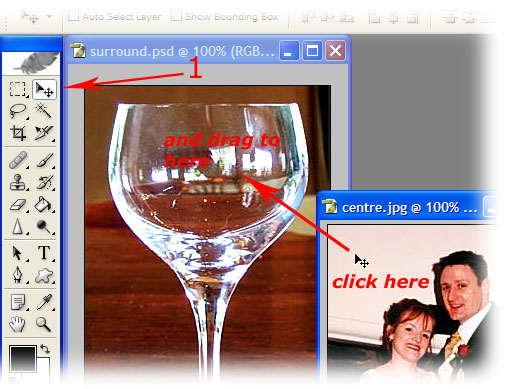
First you need to select the
move tool (arrow 1), and drag your “centre” photo over to the “surround” photo. Have a look at the screenshot below:

What this does is copy and paste your centre to a new layer in the surround photo.
Contemporary wedding photography tips – multiple exposures pt 2:
Resize your “centre” so that the faces fit neatly into your surround. The easy way to do this is:
- go to edit, and then choose free transform (or press [Ctrl]+[T] on your keyboard)
- a box will appear around your centre layer. Hover your mouse over any of the four corner handles, until the cursor changes to a double arrow.
- while holding down [Shift] on your keyboard, left click your mouse and resize the centre so that it fits your surround.
NB: holding down [Shift] as you drag the mouse ensures the image stays in proportion. If you don't hold down [Shift] the image can distort - get thinner, or fatter.
Contemporary wedding photography tips – multiple exposures pt 3:
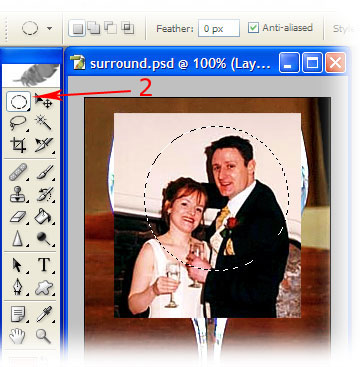
In your layers palette, make sure you have your “centre” layer selected. If you can’t see your layers palette, press [f7] on your keyboard. Click on your centre layer.
You then need to select the elliptical marquee tool. If you only see the square marquee tool, right click the icon and a menu will pop out. It’s arrow 2 in the screenshot below:

Drag out a circle around your centre. If you want to make sure you get a perfect circle, hold down [Shift] on your keyboard as you drag.
Let go of the mouse when you are happy with the size of your selection, but don’t worry if the selection isn’t exactly where you want it. Once you let go of the mouse you will be able to re-position the selection to where you do want it.
Contemporary wedding photography tips – multiple exposures pt 4:
Once you've made your selection, go to select and then inverse. This selects everything around your central selection.
We now need to soften the edges of the selection so that it blends with the background a little better. Choose select and then feather. Enter a number in the box of about 50 – but do experiment with this setting.
What we now have is a nicely softened selection of our centre.
Contemporary wedding photography tips – multiple exposures pt 5:
The last step is to remove the area around the centre. We can simply delete it. Go to edit and choose cut. The area surrounding the centre will disappear leaving just the middle overlaid.
Job done! Well, almost. Make sure your centre is in the right place (use the move tool - as you did in pt 1 - if it isn’t). Then the final step is to merge the two separate layers.
Go to layer and choose flatten image. Then all you need to do is save your new multiple exposure digital photograph!
For more contemporary wedding photography tips go to the contemporary wedding photography editing home page
Return to top
Return to digital-photography-tips.net home

 The way to use these filter masks was as follows:


