|
Soft focus is a classic artistic wedding photography effect. It’s easy to produce with digital photography.
This digital wedding photography tutorial concentrates on creating that soft focus effect in Photoshop.
Go to the
editing wedding photography home page
for more digital wedding photography effects and tutorials.
The artistic wedding photography pages, and digital-photography-tips.net itself, is updated regularly. To learn out about the updates as they happen subscribe to the digital photography blog, and this site’s RSS feed.
Isn't it just a badly focused photograph?
The soft focus effect makes a nice artistic wedding photography effect. It seemed to be very popular in the 1980s. I’m sure one of the reasons for its popularity stemmed from its use in TV.
Back then soap stars had to look great. And when the make up artists could do no more, the soft focus camera-man stepped in. For years I thought Joan Collins was just an out of focus actress!
This brings me to my first digital wedding photography tip concerning soft focus – don’t assume it’s just a badly focused image!
A soft focus image is actually a crisp image that has a certain ‘halo’ or ethereal haze effect applied. It’s this ethereal haze that makes such a nice artistic wedding photography effect.
Try to create the effect by taking an out of focus shot and you’ll get nothing more than an out of focus photograph!
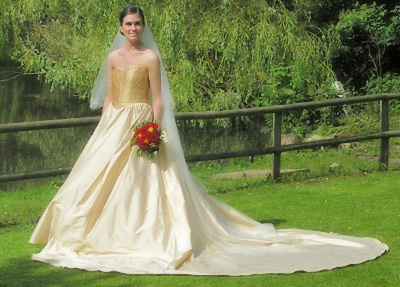
Roll your mouse over the image below to see what I mean.
The correct method of producing a soft focus effect results in that nice, ethereal haze. It works well for weddings because it creates that dreamy artistic wedding photography look and feel. And in digital photography it’s easy to achieve.
NB: in the digital wedding photography tutorial below, words in bold green refer to menus and menu items in Photoshop.
Creating that ethereal haze
Ok, lets get some nice soft focus artistic wedding photography going. Load a suitable digital photograph into Photoshop.
Go to Layer and then choose Duplicate Layer… from the drop down menu. You will get a dialogue box asking you to name your new layer. Name it if you like, or just click on OK to continue.
This has created a new, and identical layer, on top of your original photograph.
The next step is to apply some blur to that new layer.
NB: your original layer is untouched underneath this new layer. So if you make a real mess of the new layer, just delete it and start again. A good digital photography tip for artistic wedding photography – always work on a new layer, never the original layer!
To apply the blur, go to Filter, and then go down to Blur and choose Gaussian Blur… from the pop-out menu.
This opens a new dialog box like the one shown below:
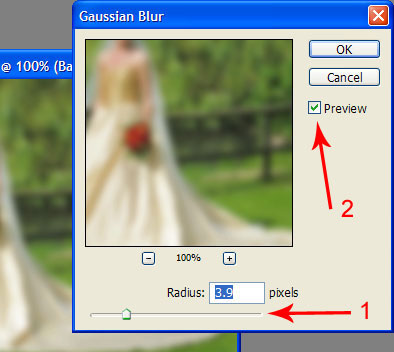
Move the slider (arrow number 1 in the screenshot above) to adjust the amount of blur. It depends a little on what photograph you have as to how much blur you use. Don’t go too mad though, otherwise the effect will be completely lost. Check the Preview box (arrow 2 above) to see what’s happening in your photograph.
Once you have settled on an amount of blur (I went for about 4), click OK. At this stage all you have is a blurry image. The next step is to let the original, sharp image, from below come through.
Let the layer shine through! To do this we use the opacity setting. Make sure you can see your Layers palette. If you can’t, just press F7 on your keyboard and it will appear like magic!
Have a look at the screenshot below:
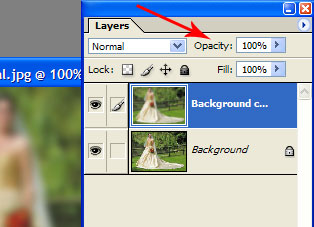
The opacity box is arrowed. This needs to be adjusted to create an artistic wedding photography effect.
What we are going to do here is change the strength of the top (blurry) layer. At 100% it completely covers the layer underneath. Blurry is not artistic wedding photography!
We need to lower this a bit, to let the focused layer beneath come through, then we’ll start to see the artistic wedding photography appear.
More than one way to change opacity There are three ways to lower this. You can click in the box and just type a value in.
You can highlight the box and then use the up and down arrows on your keyboard (if you hold SHIFT down as well, the numbers go up in tens).
The final method is my favourite. Place your cursor over the word Opacity itself. Your cursor will change to a small hand with a double headed arrow. Now just click and slide your mouse. Neat, huh?
Whichever method you choose, adjust the blurry layer to your liking. For artistic wedding photography you will probably find somewhere between 40%-60% is about right.
This “controllability” is one of the best things about digital photography. If you don’t like the look at first, adjust it until you do.
Once you’re done, don’t forget to flatten your image. Go to Layer and then Flatten Image. Finally save it under a new name. Do not, I repeat, do not, save it over your original image. Read this important digital wedding photography tip to find out why.
So there you have it, a nice artistic wedding photography effect by applying a soft focus to create an ethereal haze. Click to go back to my Digital wedding photography – editing home page for
more artistic wedding photography tips.
|
Click & Add:  Blink Blink  Del.icio.us Del.icio.us  Digg Digg  Furl Furl  Google Google  Simpy Simpy  Spurl Spurl  Technorati Technorati  Y! MyWeb Y! MyWeb
WidgetBucks - Trend Watch - WidgetBucks.com
Sidebar . . .
One of the best things about digital photography is sharing the photos you take. However, because we end up taking so many of them, it’s easy to lose track of them all.
I recommend you give Google’s Picasa a try. It will not only organise your photos, but will perform minor edits too.
It’s all some photographers need, and best of all, it’s absolutely free!
Picasa comes as part of the Google Pack. If you don’t want the rest of the pack just de-select them when you get to the download screen.
|


