|
Dear Stay Focussed reader,
Welcome to the latest newsletter.
I remember taking some wedding photos years ago (back in the bad-old-days of film!) and was chuffed to bits when I managed to put the face of the bride and groom onto a wineglass.
I remember people asking me "how did you do that, it's amazing" (you had to be there!). "It's a multiple exposure" I'd say, pleased as punch that someone appreciated my efforts.
Multiple exposures are one of the many film photography techniques that have made its way over to digital.
Filters are another example - I remember spending ages aligning my Cokin graduated blue filter over a scene to make the sky appear more punchy (and if you don't know what that means, don't worry - it's just a relic from the past!).
Now, with the aid of a digital camera, and some trusty software, I can achieve the same effect with just a few clicks, and I don't have to spend hours outside getting numb fingers either!
Multiple exposures
So, back to those 'multiple exposures'.
As you may well have guessed, a multiple exposure is when you take more than one photo of a scene.
Once you understand the concept you can create any number of interesting photography effects.
The basic idea is this - take one photo of a scene, then, without moving your camera (a tripod helps, but often a steady hand (don't drink too much coffee before-hand!) and a crouching position will do) take a second photo of the same scene where something has now moved or been added.
When you come to the processing stage, what you do is layer the two images on top of each other, and then mask out anything from the top layer that you don't want to see, allowing the bottom layer to show through.
To find out more about layers, have a look at this ghostly tutorial.
So, what effects can be created?
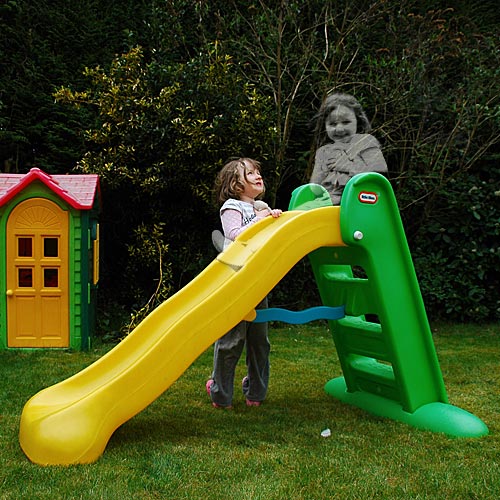
The creativity this allows really is endless. I've put a few examples up on the site in recent weeks - the latest one being a ghostly image of my daughter, have a look below:
All we did was take one photo of her sitting on the slide, then she moved round to stand next to the slide.
We combined the two images and made the top one (the ghost) black and white. We then masked out everything from that top, black and white, image so that only the ghost appeared.
The final thing was to reduce the opacity of the top layer, the ghost, so that some of the background appeared through her.
There's a full tutorial for this trick photography effect here, and also a link to free online image editing software (so you don't have to buy anything!)
If that's got you thinking, have a look at the other creative ideas (some for multiple exposures) on the right here >>>>
Hope this has been useful. More tips in the next newsletter. Until then, why not join me on Facebook? I post regular updates there in between newsletters.
Darrell.
|
Trick Photography - multiplicity photos

Has this newsletter got you thinking about trick photography? Here's another cracking trick photography technique.
Getting creative - with nothing more than a brick wall!
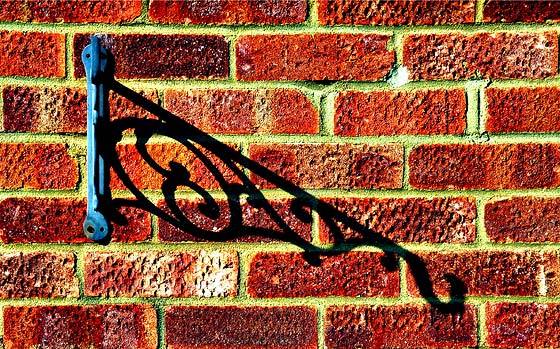
It doesn't always take much to get creative. I set myself a task - take a creative photo with nothing more than a wall for inspiration!
An idea for all those 'lost' photos
Found some photos on your hard drive that didn't make the cut? No problem, try this photo idea to give them a new lease of life.
Tree in bloom

A visitor's submission of a tree in bloom. But is there more that could be done to improve the photo?
|