
November 16, 2007
Welcome to the digital-photography-tips.net monthly ezine.
This month . . .
- New additions to the site
- A tip on getting the best light
- Tips on using Photoshop Elements Tag tool
Additions to the site the newest photography tips and tricks!
Heres the latest additions to the site, and a few other highlights, always worth a look . . .- More travel photography tips
- My Story how digital-photography-tips.net came into existence!
- What causes red eye, and how to avoid it.
Photogenic places of the world - #8
Machu Picchu
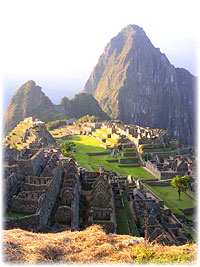
The scenery is fantastic there are deserts in the west, mountains in the middle, and rainforests in the east. A photographers dream!
The main draw card for visitors to Peru is Machu Picchu The Lost City of the Incas.
It is possible to access Machu Picchu by road, climbing just the last section. These visitors leave the site early in order to get back down to their coaches.
The alternative is to arrive the way the Incas did on foot across the Andes. Arrive this way and you will be at Machu Picchu late in the day and this is where my tip comes in . . .
By arriving late in the day, the light is softer. The light in the middle of the say is bright. This means photos can look washed out. But the light at the end of the day (and the start of the day) gives more saturated colours.
Plus another benefit is that the site isnt crawling with visitors!
So my tip if possible, try to take photos near the end of the day for more saturated colours.
Photoshop Elements tips and tricks
In this section tips and tricks to help you get the most out of Photoshop. These tips will always be based on Adobe Photoshop ElementsPhoto Browser Tips
Photoshop Elements has two halves to it. A photo browser and a photo editor.
This month my tips again relate to Photoshop Elements photo browser helping you organise your digital photo collection!
Also see last months tips for using the Photo Browser to place your photos on a map.
After a while digital photographers amass a phenomenal number of photographs. Photoshop Elements tags can organise them. Heres how to do it:
When Photoshop Elements loads up, choose View and Organize Photos. Then:
- In the Organize pane (on the right of your screen), right click any of the categories that have a small blue arrow next to them (except Favorites)
- In the pop out menu, choose Create new tag in . . .
- In the next box, give your tag a name, then click OK
- Your new tag will appear in the Organize pane
- Move your mouse cursor over your new tag. The cursor will change to a hand symbol.
- Hold down your left mouse button, and you can now drag-and-drop your new tag onto any photo that you want tagged.
Help Wanted!
My aim is to share digital-photography-tips.net, and this newsletter with as many people around the world as possible helping the whole world take better photos!If you know of someone who would be interested in receiving this newsletter, please forward this email onto them, and ask them to click here, or send them this link:
https://www.digital-photography-tips.net/Digital-photography-tips-newsletter.html