
October 18, 2007
Welcome to the digital-photography-tips.net monthly ezine.
This month . . .
- A tip on what to do with your holiday photos when you get back home
- How to use Photoshop Elements to organise your photos
- New additions to the site
Photogenic places of the world - #7
Sydney
Sydney is a stunningly attractive city, which means photographers get more than a little snap-happy! I arrived at the Circular Quay in Sydney with the Harbour Bridge on my left, and the Opera House on my right. And couldnt stop clicking away at both!
The problem is when you get home. All those photos of the same thing. What do you do . . . ? Well, heres one tip for you if you ever find yourself in a similar situation create a collage. My Opera House collage is below:
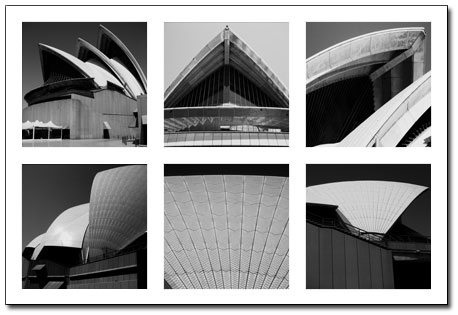
The trick here is to look through your photos, with the aim of finding bits that you can use in your collage, rather than looking for whole photos.
In my example I have bits of the opera house. Never the whole thing. Anyone viewing the collage is in no doubt its the Opera House, even though there isnt actually a photo of the whole of the Opera House itself.
Making a collage like this is a neat way to combine a group of photos of the same thing into one image.
Photoshop Elements tips and tricks
In this section tips and tricks to help you get the most out of Photoshop. These tips will always be based on Adobe Photoshop ElementsPhoto Browser Tips
Photoshop Elements has two halves to it. A photo browser and a photo editor.
Most people are aware of the photo editor part. But the photo browser part is less used. This month my tip relates to Photoshop Elements photo browser helping you organise your digital photo collection!
Lets say you want to organise your photos according to the place you took them. Heres what you do:
When you start Photoshop Elements, choose the View and Organize Photos button. Then:
- Select photos that were taken in the same place (hold down [Ctrl] as you click to select multiple images)
- Whilst your cursor is over any of your selected photos, click your right mouse button
- In the menu that appears, select Place on map
- In the next box, type an address. At this point, make sure you are connected to the internet for this to work.
- When you click Find Elements goes off and finds your location for you
You can now find your photos by scrolling across the map!
Further reading the newest photography tips and tricks!
Heres the latest additions to the site, and a few other highlights, always worth a look . . .- Some tips and tricks for travel photography
- Quick tips using a digital camera (updated)
- The history of digital photography
Help Wanted!
My aim is to share digital-photography-tips.net, and this newsletter with as many people around the world as possible helping the whole world take better photos!If you know of someone who would be interested in receiving this newsletter, please forward this email onto them, and ask them to click here, or send them this link:
https://www.digital-photography-tips.net/Digital-photography-tips-newsletter.html