Travel photography tips -
which of these photo ideas will work for your trip?
Good travel photography can reward you with the best memories of your trip. Better than any number of souvenirs, and probably a lot cheaper too!
On this page you'll find some tips on what to take photos of, and how to go about it. Follow the guidelines here and you should return home with a collection of photos to be really proud of...
Travel Photography Tips - the right approach
When thinking about what to take photos of, try to imagine a 'coffee table' book containing a story of your trip.I love these books. They look professional, they are great to pass around, and they save you having to slip lots of photos into albums.
The downside is that they are expensive. They're getting cheaper every year and, if you can afford one, they are well worth trying.
Even if you don't plan to produce a book of your own, think along the lines of a book. The reason I say this is because a book has a start, middle and end (just like how we learnt to write stories at school!)
Then, plan your photos around the start, middle and end. Like this . . .
Travel Photography Tips the 'start'
The starting photos are a brief record of the journey to your destination. You could start taking photos in the planning stages, or wait until the day you leave. Either way, here are some ideas of photos you could take:
|
|
I guess the point I am trying to make here is to look for photo opportunities that will tell the whole story of your trip.
It's worth mentioning at this point that these 'start' photos are unlikely to be wall-hangers. But they do help to tell the story.
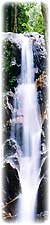
Travel Photography Tips - the 'middle'
The 'middle' of your trip is where the lion's share of photo opportunities exist. These are the photos you take when you are actually at your destination.Still thinking along the idea of a book, this section could be made up of many 'chapters'. Each chapter could be a day of your trip, a tourist sight or an activity.
Travel Photography Tips - Photographing the 'icons'
So how do you do these photographic icons justice? Well, here are a few tips for you:
- Plan your time of day. If you can, try to take your photos in late afternoon or early morning. The light is much better then.
- Try to work out which direction the icon faces. The sun always rises in the east and sets in the west. If your icon faces eastwards, get there early so that it is lit by the morning sun. The opposite applies for west facing objects.
- Find out when the tourist crowds are likely to arrive. Many popular tourist sights fill with visitors from mid-morning onwards. If you want the crowds in the photo, get there later in the day. If you want to avoid them, go early!
- Take photos of 'parts' of these buildings, and then combine the parts when you get home to create a montage.
A travel photography warning! Some places will charge you for taking a camera in. Be aware of this, and don't try to hide your camera to avoid paying.
I have seen officials check customers' tickets to see if they have paid for camera use. And I have seen them give non-payers a very uncomfortable time (although I have never known anyone actually have their equipment confiscated.
Also be aware of the political situation in the country you are visiting. Some countries take a very dim view of photographers poking their lenses at certain government buildings.
This can cause problems in countries that are seemingly benign. I remember a few years ago a group of English plane spotters were imprisoned for taking photos of aeroplanes in Greece. Greece! It's hardly the most obscure part of the globe.
It is worth doing a little investigation before you begin to snap away, but to play it safe, avoid photographing government buildings, unless they are clearly ceremonial too. I would also avoid photographing government officials.
Travel Photography Tips - Photographing people
 |
Taking photos of people can provide you with some of the most rewarding photos of your trip. Here are a few pointers:
If possible, ask before you take your photo. Eye contact can make a portrait, and without it, photos of people lack that final 'punch'. And if you get eye contact with someone without asking first, you are inviting trouble. A few ways to improve your chances of photographing people: |
- Ask nicely! And perhaps throw in a compliment too. I really love your colourful scarves, would you mind if I took a photo . . .
- If you are in a foreign country, learn how to say "may I take your photo?" in the local language. Locals love it when a tourist goes out of their way to learn a phrase or two, and will be more likely to oblige you.
- Show them the photo afterwards (a real boon for digital photographers!). They love to see the results!
- Offer to email them a copy of the photo.
- Smile!
- If they do refuse, don't push it. No photo is worth getting into an argument over.
Travel Photography Tips - the extras!
| So, you've photographed the sights, you've photographed some character-full people . . . now what? Well, here are a few ideas of things you could photograph to fill in the gaps: |  |
- A shiny car badge of a locally produced car,
- A street sign of a famous street,
- A close up of a flower in bloom,
- A local newspaper (make sure the name of the paper is large in your frame),
- A photo of you sipping coffee in a local coffee shop,
- Close ups of some local food (perhaps in a local market),
The point is, they are not everyday items to you. And that's why they will make interesting additions to your photos.
Once you get the hang of looking for these small things, you will find many more 'extras' to add to this list. These extras add some flesh to the photographic bones of your trip. They help make it complete
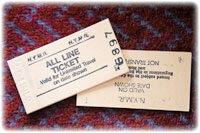
Travel Photography Tips - the 'end'
- A close up of the stamp in your passport.
- Spread out any used tickets of places you visited/trains you went on, and take a photo of them.
- A photo of you arriving home, perhaps bleary eyed after all that travelling!
Further Reading:
Click on the links below for further reading on travel photography:
- Travel photography home page
- Tips on travelling with your camera
- Newsletter back issues - a travel photography tip in every issue!
- Digital photography tutor home page
- digital-photography-tips.net Newsletter sign-up page
My son (that's him below) loves F1. He's started his own YouTube channel and would love it if you could take a look at one or two of his videos.
Or, if it hurts your ears as much as it does mine, pass the link on to someone who'll really appreciate it.
Or, if it hurts your ears as much as it does mine, pass the link on to someone who'll really appreciate it.
(probably someone a lot younger than I am!)
 Get help using your camera with the complete Digital SLR Guide |