Free photo imaging software – Picasa
As already explained on the free photo imaging software reviews home page, photo software usually has two parts to it – the album (that organises your photos) and the editing part (that allows you to edit your photos)This page focuses on the free photo imaging software - Picasa. Picasa is Google's own photo software. It has a reasonable album part, and, although the image editing options are limited, they are good enough for many digital photographers.
Perhaps the best thing about Picasa though is the price – when they say it's free photo imaging software they mean it. It is indeed absolutely free! Yep, you can download it and install it and it won't cost you a bean.
It therefore makes sense to give Picasa a try. If it does everything you want it to do then you've got yourself a bargain. And if it doesn't, then you haven't wasted anything in the process.
Here you'll find a hands-on review of this free photo imaging software, so you'll have some idea of what it can do.
What's it like to use?
When you first install Picasa it will automatically start to organise your photos for you. It will search your hard drive for any image file and add it to your album of photos.It will do this for most file formats (jpeg, gif . . .), but not RAW files. If you take RAW photos, then Picasa is not for you. If you don't know what a RAW file is, then you don't need to worry!
By default Picasa will look everywhere on your hard drive for any image file. This can take a while. To speed things up you can tell Picasa which folders to look in. So if you save your photos in just a few folders, tell it where those folders are and it will ignore the rest.
One clever trick is that once you have set the folders you would like Picasa to look into, it will constantly update your album whenever you move photos into those folders.
It's like having an automatic real time update of all your digital images.
Once your photos have been added to your album Picasa will display them as thumbnails. See the screenshot below:

In box 1 there is a list of your folders where the image files are stored on your hard drive. This can make it easier to find photos if you know where certain files are stored.
In box 2 there are the "tags". Picasa used to use labels instead of tags, but recent updates have changed that and the tags are more in line with those used in most image editing software.
You can make up your own tags and then attach them to any photo that you like. Despite all the recent updates, Picasa still doesn't make it easy for you to combine tags (to search for both "friends" and "holiday", for example).
It does however now include the ability to at least tag your photos with multiple tags. Getting there with tags, but not quite up there with the likes of Photoshop Elelments!
Box 3 is the thumbnail view of your photos.
The options for organising your photos aren't nearly as slick as something like Photoshop, but this is free photo imaging software. It works, even if it is a little clunky.
How about editing my photos?
If you double click on any thumbnail image (box 3) Picasa will load that image into the editing part of the program. Here you've got a few options. Below is a screenshot of what you can expect: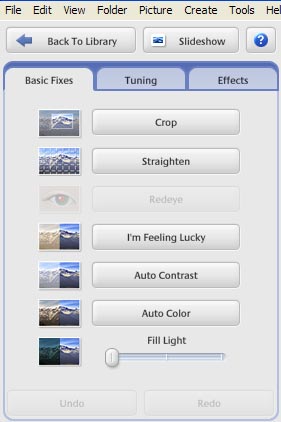
This is well worth clicking. What it does is adjust the brightness, contrast and colour of your photo. It doesn't always make an improvement, but most of the time it does. And if you don't like the effect, then simply hit the "undo" button.
The "fill light" works like a brightness control rather than a proper fill light (fill light should lighten shadows, but leave bright parts of a photo alone).
However, click the "Tuning" tab and you can make adjustments to the highlights and shadows separately.
There's more to this free photo imaging software that basic image fixes though. Picasa also comes with a few special effects up its sleeve. These are found on the "Effects" tab. Take a look at the screenshot below:
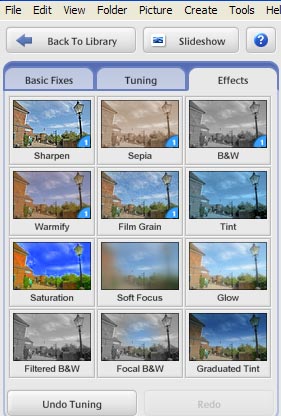
Other photo software will have not only far more options here, but also have more control over how you use those options.
For example, when making a photo black and white Picasa lets you choose a filter colour to place over the black and white effect.
It doesn't make a huge difference though, and won't make your black and white photos really stand out.
The most recent incarnation of Picasa does come with a wider range of photo effects. These are the sort of effects that we're used to seeing in photo app software for camera phones. It's worth a play with them if you'd like to see something creative.
All the effects work well enough, and it may be all you need. And, after all, this is free photo imaging software.
Free photo imaging software – Picasa summary
To sum up, the negative points first:- Album doesn't allow searching for multiple tags (although photos can at least be tagged with multiple tags)
- Editing options are limited and rely more and more on effects.
- Automatically updates your album if you add photos to your folders on your hard drive.
- The "I'm feeling lucky" button works well, and is all some photos need.
- It's free!
If you want my recommendation – try it. If it has all you need then you're onto a real winner. And if it doesn't you can go back to the free photo imaging software reviews and look for something more suited to your needs.
You can download Picasa here.
Or, if it hurts your ears as much as it does mine, pass the link on to someone who'll really appreciate it.
 Get help using your camera with the complete Digital SLR Guide |