
March 20, 2008
Dear Stay Focussed reader!
Welcome to the digital-photography-tips.net monthly ezine.
Welcome to the March Stay Focussed. Our subscriber list keeps on growing, so a special welcome to all the new subscribers! If you have any comments please don't hesitate to let us know.
This month . . .
- Tips on taking photos scenery
- How to do a 'Photomerge' in Photoshop Elements
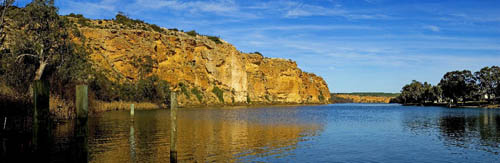
Photogenic places of the world - #12
The Murray River South Australia
When visiting scenic locations, it's natural to want to capture the views so you can enjoy them again when you return home. But somehow they often seem flat in the final print.
One of the reasons (but not the only one) is to do with the dimensions of prints compared to our own 'human' dimension. Let me explain further . . .
When you get to a scenic view, I'll bet you look left and right, rather than up and down? What you are doing is looking at a panorama. But the photo you take will be more 'square'.
The solution is to take a panoramic photo, like the one below:
There are two ways to achieve this. The simplest way is to simply crop your photo into a panorama using software. Every image editing program will be able to do this.
The other method is a little more complex, but the end result is much better. While you are at your scenic view, take a series of overlapping photos. When you return home you can 'stitch' the overlapping photos together using software.
You can do this manually, but some software (such as Photoshop) is capable of doing it for you.
Photoshop Elements tip
This month's tip is to try a panorama!First, make sure you have a series of overlapping images, as described above. Open Photoshop Elements Organizer. Then:
- Select the photos you want to merge hold down [CTRL] and then click on the photos you want. Release [CTRL] when you've selected them all.
- Then go to 'File', 'New' and choose 'Photomerge Panorama '
- The editing workspace will automatically load.
- A window will pop up showing your images. Click 'OK' and Elements will merge your images.
Try this on a scenic photo and see the difference it makes!
If you want to find out more about photography, these are our RECOMMENDED eBOOKS:

| "Digital Photography Secrets" |
|
| "267 Simple Tips For Sensational Photos" |
|
| "Income From Photography" |
Help Wanted!
My aim is to share digital-photography-tips.net, and this newsletter with as many people around the world as possible- helping the whole world take better photos!If you know of someone who would be interested in receiving this newsletter, please forward this email onto them, and ask them to click here, or send them this link:
https://www.digital-photography-tips.net/Digital-photography-tips-newsletter.html