|
Dear Stay Focussed reader,
Welcome to the latest newsletter.
If you're anything like me, you'll have a hard drive full of some very 'average' looking photos?
It's those photos that are the focus for this month's newsletter. What if we could perk-up those photos and bring them back to life?
Here's one simple method for you to try that could be just the ticket!
How can you pep-up a bad photo?
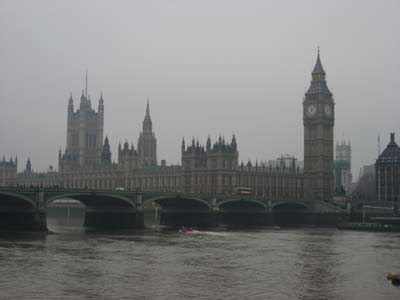
Here's the easiest way ever to improve that photo. First, have a look at the photo I took in London recently. Lousy weather (I am soooo bored of winter right now!) and a lousy photo of the Houses of Parliament was the result.
And here's the easy technique for changing, and hopefully improving, the look of this photo.
Open your photo in any image editing software. Or, if you haven't got anything installed on your computer, go to pixlr and load your image up there.
Once there, make sure your "Layers" palette is open. If you're using Pixlr it will be one of the palettes on the right side of the screen.
Start by duplicating the layer. To do this go to "Layers" on the toolbar at the top of the screen, and then choose "duplicate layer" from the drop-down menu.
Once done, you'll have a copy of your first layer in the layers palette.
Now, here's where the magic unfolds...
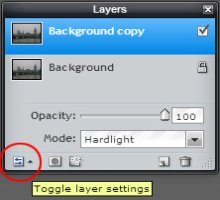
| Go to the layers palette, and, if you're using Pixlr, click on the small icon in the bottom left of the palette. I've circled it in the screenshot here.
Click on this little button and a new menu appears. |
On this menu you can change the layer settings by clicking on the drop-down menu arrow next to the "mode" box. Usually you'd go for "normal", but there are plenty of other options there.
The different options change how the pixels in the duplicated layer affect, or are affected by, the pixels in the background layer below it.
The science gets complicated, but all you need to do is try the different layer settings until you find one that improves your photo.
Some effects get a little weird - you have been warned!
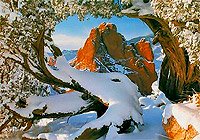
By fiddling around I managed to change my initial, boring, London photo into a silhouette. Here it is:
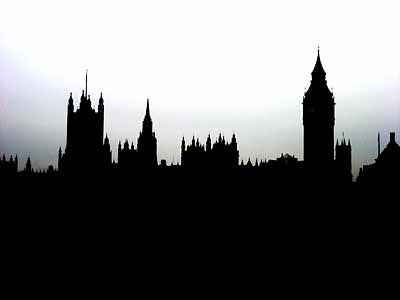
I think it's certainly an improvement on the original photo, and only one of many alternatives available.
So there you go, one filter that creates an effect that's impossible to recreate in Photoshop.
I was going to write a short piece about neutral density filters, but ran out of time (sorry!). I'll definitely get round to it next month. Until then, join me on Facebook, and, have a look at the latest photography tips added to the site - use the links to the right here >>>.
Darrell.
|
Site Updates:
Travel photography tips - photo ideas for your trip?
Going away? Taking a camera (I bet you are!)? Photo ideas for your trip can come from unlikely sources ... continue reading travel photography photo ideas
Know how to travel with your digital camera?
Now you've planned your trip, it's worth thinking about how to travel with your digital camera so that ... read more about travelling with a digital camera
Photos of Salt Lake City by a site visitor
Salt lake city must be one of the most photogenic places on the planet if these photos submitted by a site visitor are anything to go by ...see more visitor photos
Wildlife Photography
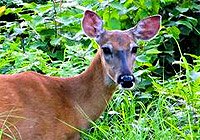
Wildlife photography has always been popular. It's not all about spending hours sitting in cramped positions waiting for ...continue reading about wildlife photography
|